

Record Your Screen and Turn It Into an SOP With AI

SOPX now has a built-in screen recorder. Record a software process with your voice and camera, stop, and AI turns the recording into a step-by-step SOP. No separate recording app needed.
TL;DR
SOPX now has a built-in screen recorder. Until now, you had to record a software process in a separate app, save the file, and upload it. Now you click New Procedure > Record screen, turn on your microphone, and record a browser tab, a window, or your whole screen. When you stop, you name the procedure and AI turns the recording into a step-by-step SOP, the same way it does for any uploaded video. Available on every plan, including the free trial.
- No separate app. Record, review, and generate in one place.
- Narrate as you go. The AI uses your voice to name and explain each step.
- Optional camera bubble. Show your face in the bottom-right corner of the video.
- Countdown. Off, 3, 5, or 10 seconds, so you have time to get ready.
- Floating controls in Chrome and Edge. Pause, mute, or stop without switching back to SOPX.
- Check before you generate. Watch the recording, download it, or record it again.
Why we built a screen recorder into SOPX
Most teams we work with document two kinds of work. There is the hands-on work on the floor: a machine setup, a cleaning routine, a delivery check. And there is the on-screen work around it: booking an order in the ERP, closing a work order, printing labels, or entering a batch record.
For physical work, you film with a phone and upload the video. For software work, you needed a separate screen recorder. You had to install it, find the file, and upload it to SOPX. Three extra steps before the AI could do anything, and one more tool to explain to every new author.
Now the recorder is part of SOPX. One place for both kinds of procedures, and one less tool for your team to learn.
| Step | Before: separate recording app | Now: built-in screen recorder |
|---|---|---|
| Get a recorder | Find, install, or get IT to approve an app | Already in SOPX, nothing to install |
| Record | Record in the other app | Click New Procedure > Record screen |
| Save the file | Export it and find it on your computer | Nothing to save, the recording stays in SOPX |
| Upload | Upload the file to SOPX | Already attached to the procedure form |
| Check it | Open the file in a video player | Watch, download, or re-record on the same page |
| Generate the SOP | Start generation | Start generation |
How to record your screen in SOPX
1. Choose Record screen
Click New Procedure and choose Record screen. It sits right next to Upload video, Upload document, and Start from scratch.
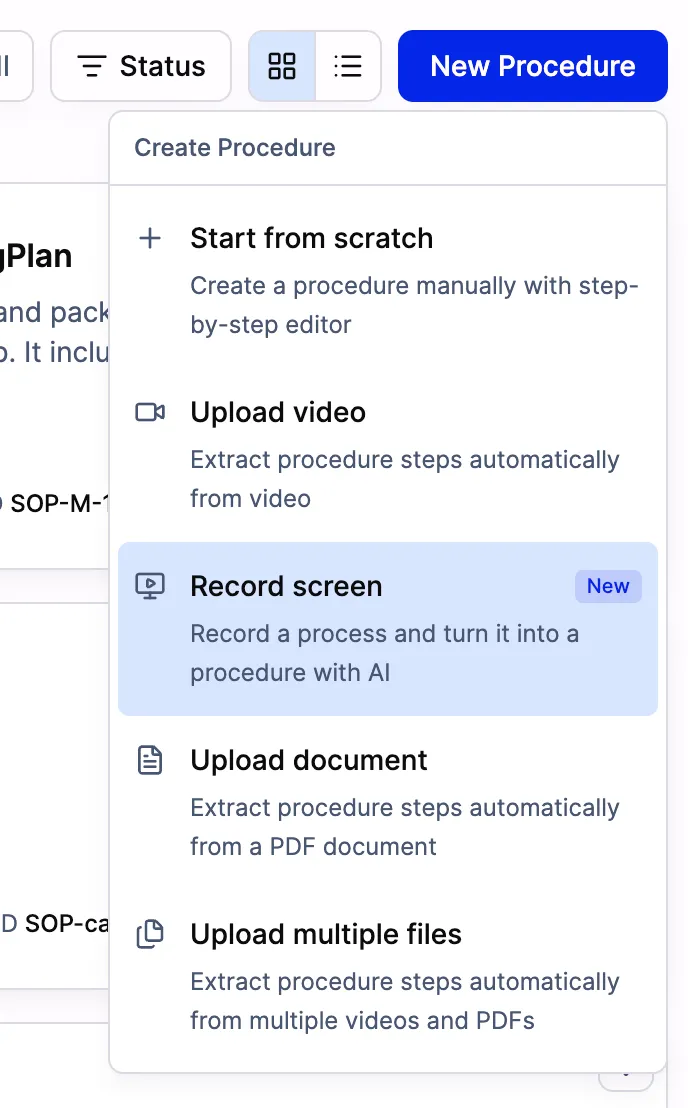
Record screen is a new option in the New Procedure menu. It turns a process on your computer into a procedure with AI.
2. Set up the microphone, camera, and countdown
A setup page opens. Choose your options before you start:
- Microphone. Turn it on and pick your microphone from the list. A level meter shows that the browser hears you. We highly recommend recording with your voice. Your browser will ask for microphone access the first time, so click Allow.
- Show my camera. Turn this on to add a round camera bubble in the bottom-right corner of the video. It appears in every step clip, so viewers see who is explaining the process.
- Countdown. Choose Off, 3s, 5s, or 10s. The countdown gives you time to switch to the app you want to record.
The page also shows how long you can record. Recording stops by itself at your plan’s video length limit: 10 minutes on the free trial and 20 minutes on Pro.
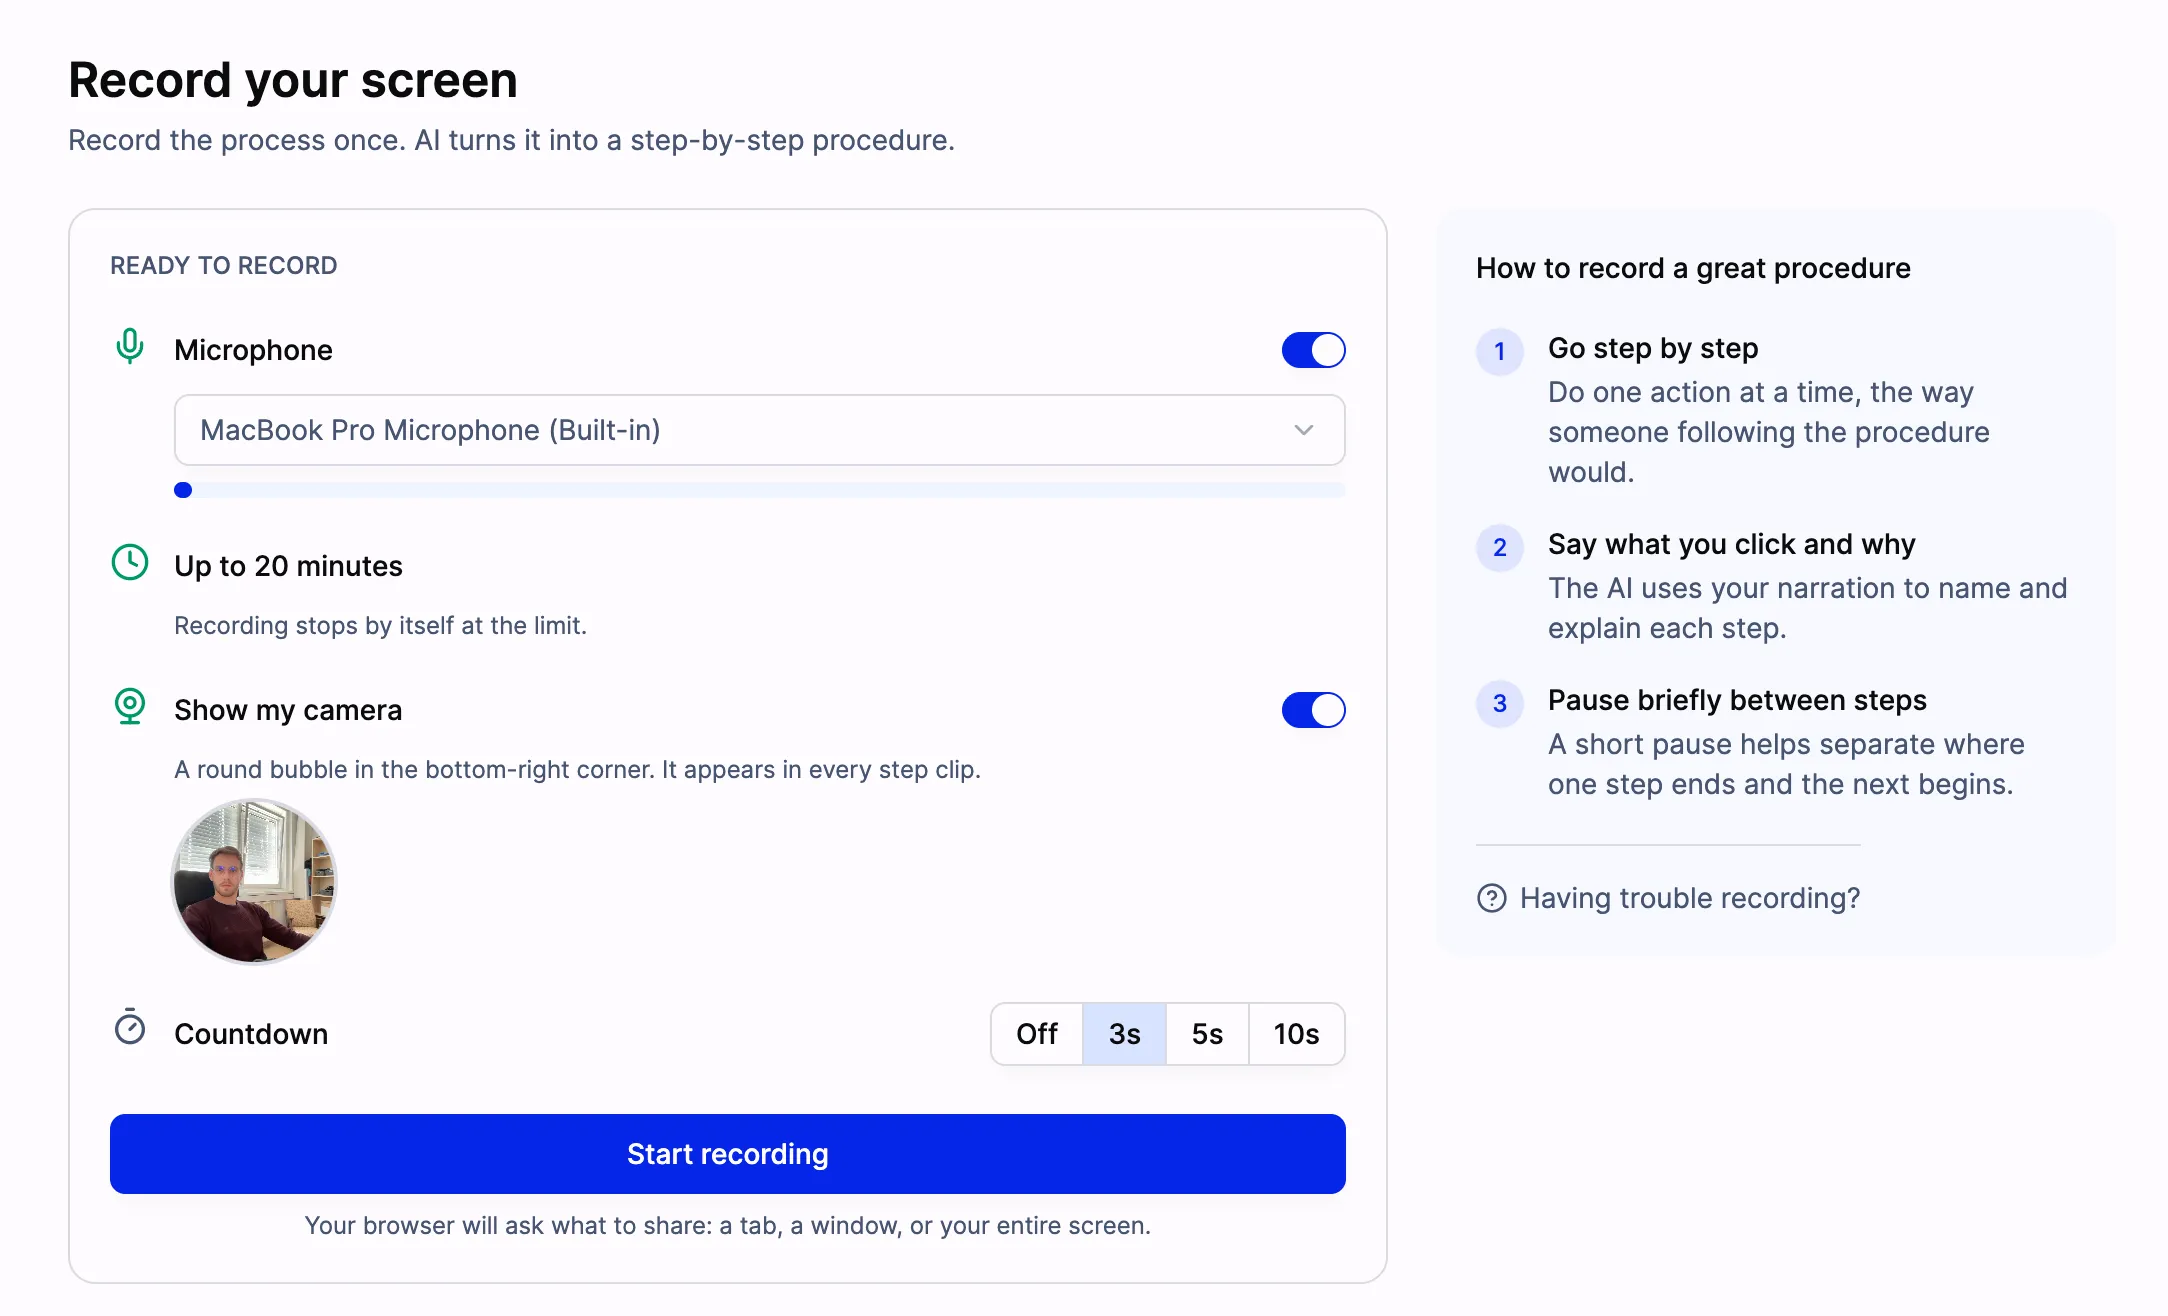
The setup page. Microphone on with a live level meter, the camera bubble preview, and a 3-second countdown. Tips on the right explain how to record a procedure the AI can split into clear steps.
3. Start recording and pick what to share
Click Start recording. Your browser asks what to share. Pick the smallest option that covers the whole process:
| What to share | Best for | Example | Good to know |
|---|---|---|---|
| A browser tab | One web app | Booking an order in a web ERP or CRM | Notifications and other tabs stay out of the video. In Chrome you can switch to another tab while recording |
| A window | One desktop app | Printing labels, filling a spreadsheet | Only that window is recorded, even if other apps open on top |
| Your entire screen | A process that moves between apps | Copying data from email into the ERP | Everything on screen is recorded, including the floating controls, so close private apps first |
After the countdown, do the task the way you normally would, and talk through it as you go.
4. Use the floating controls
In Chrome and Edge, a small floating window stays on top of your other apps. It shows the recording time and gives you quick buttons to pause, mute, and stop. You do not need to switch back to the SOPX tab to control the recording.
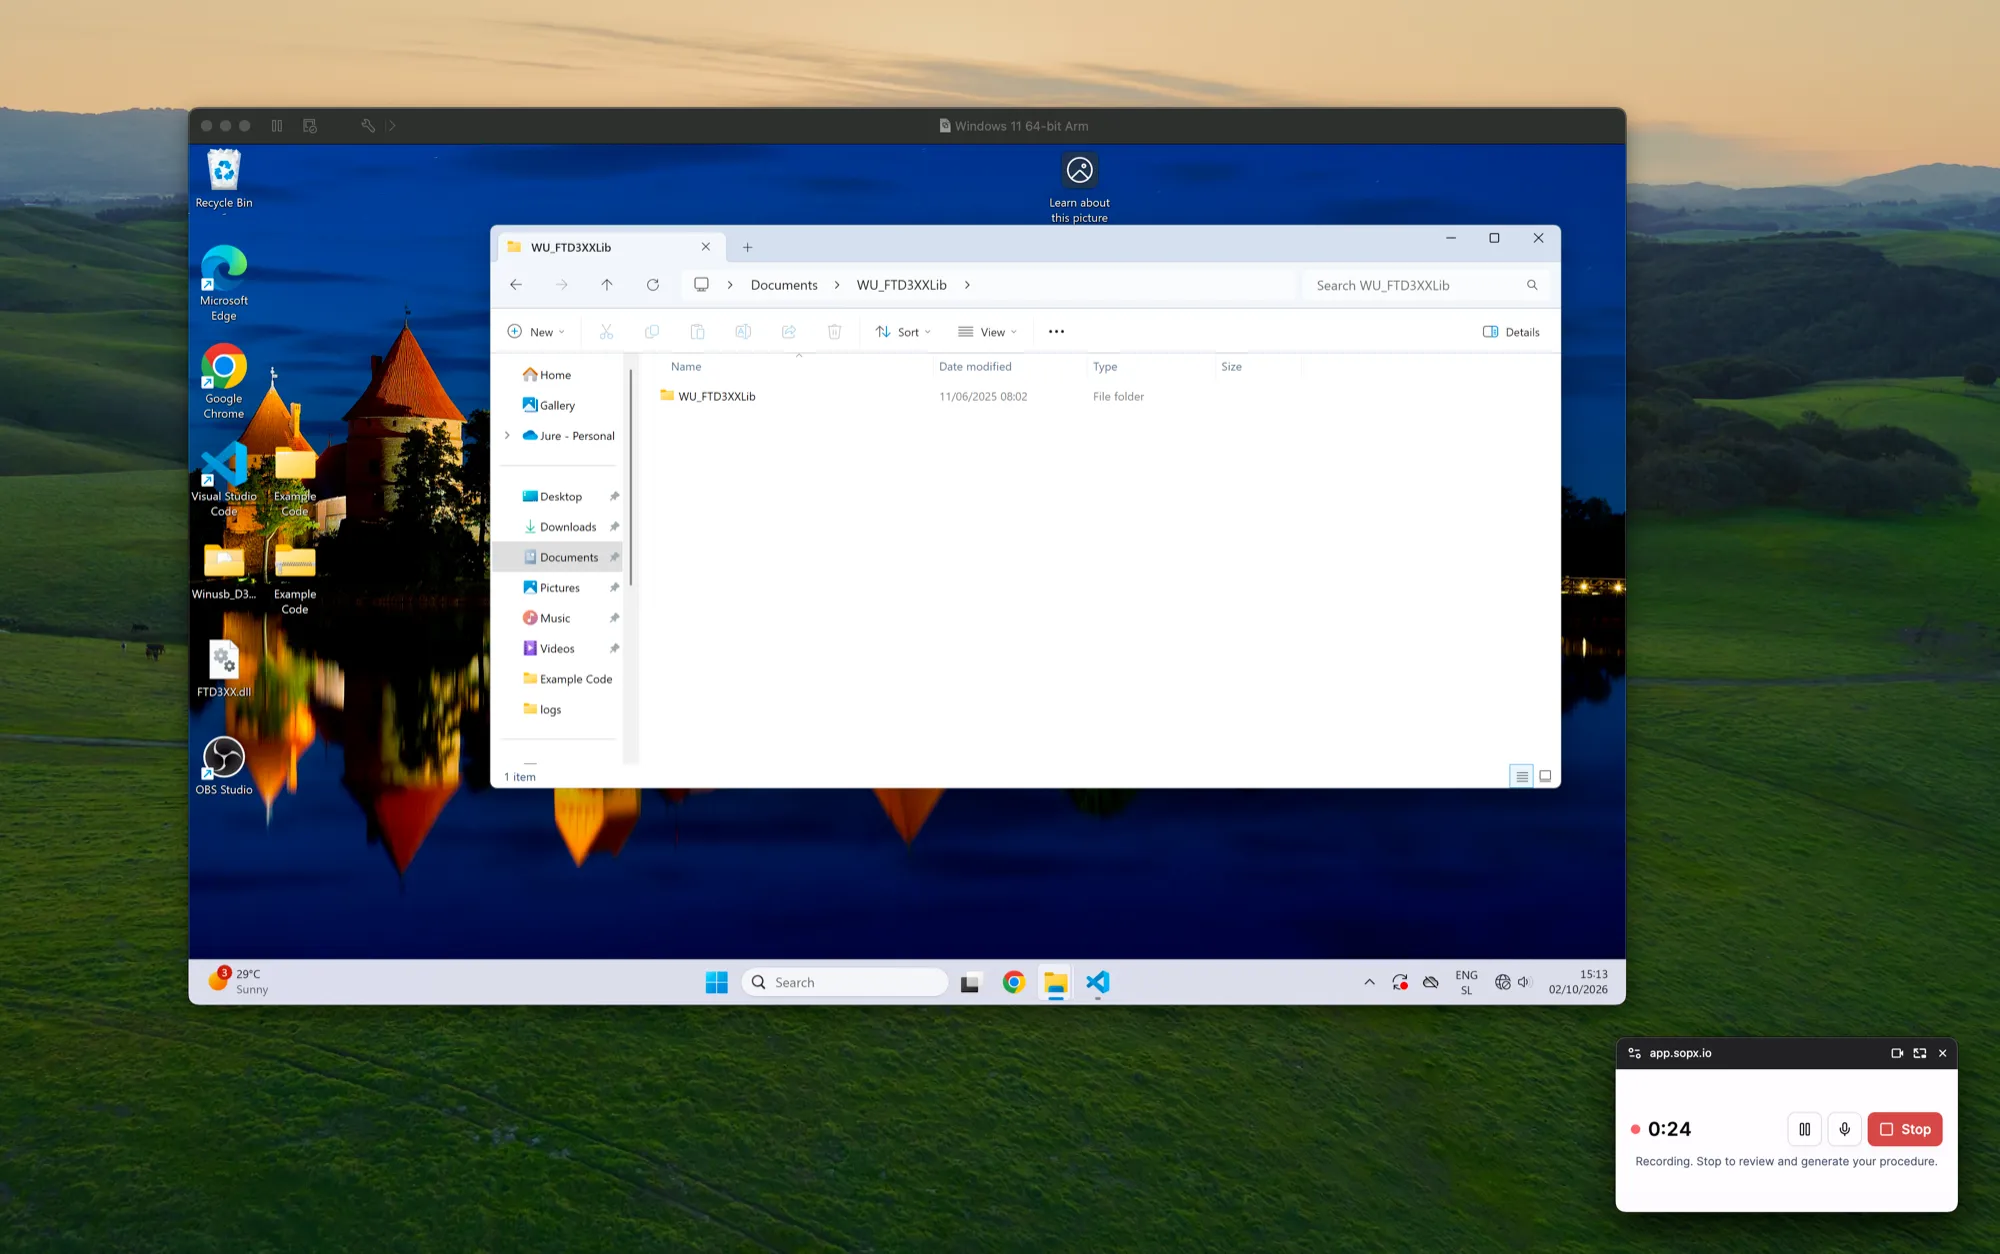
Recording a process in Windows File Explorer. The floating window in the corner shows the timer and the pause, mute, and stop buttons.
In other browsers, you control the recording from the SOPX tab or the browser’s own “Stop sharing” bar.
5. Stop, review, and generate the SOP
Click Stop when the process is done. You land on the familiar procedure form with the recording already attached. From here you can:
- Watch the recording to check that it captured the right screen.
- Download it if you want to keep a copy.
- Record again if something went wrong.
- Name the procedure, pick a workspace and folder, set other options as usual, and start generating.
AI then builds the SOP the same way it does for any video to SOP upload. It splits the recording into steps, trims a video clip for each one, and writes a title and description for every step. You review the draft, edit what you need, and publish.
Tips for a screen recording the AI can turn into a great SOP
The setup page shows three tips. They make a real difference to the result:
- Go step by step. Do one action at a time, the way someone following the procedure would.
- Say what you click and why. The AI uses your narration to name and explain each step. “Now I open the Orders tab, because new orders land here first” gives a much better step than silent clicking.
- Pause briefly between steps. A short pause helps the AI see where one step ends and the next begins.
A few more from our own testing:
- Close what you do not need. Mute chat notifications and close private tabs before you share your entire screen.
- Use test data. Record with a demo customer or a test order, so no personal data ends up in the clips.
- Keep it to one process. One recording per procedure gives cleaner steps than one long recording of a whole day.
After generation, you can still annotate the key frames with arrows and callouts to point at the exact button.
A concrete example
A warehouse team lead needs an SOP for booking a return in the ERP. Before, that meant finding a screen recorder, recording the process, saving the file, and uploading it.
Now the team lead opens SOPX and clicks New Procedure > Record screen. The microphone is on, the countdown is set to 3 seconds, and the ERP browser tab is shared. The lead books a test return and explains each field while filling it in. After four minutes, Stop in the floating window ends the recording. The procedure gets a name, “Book a customer return in the ERP”, and generation starts.
A few minutes later the draft has nine steps, each with a short clip, a title, and a description written from the narration. One field name needs a fix, then the SOP is published. The same library already holds the team’s phone-recorded SOPs for receiving and putaway, so new hires find the floor work and the system work in one place.
Good to know
| Built-in screen recorder | |
|---|---|
| Plans | Every plan, including the free trial. See pricing |
| Recording length | Stops by itself at your plan’s limit: 10 minutes on the free trial, 20 minutes on Pro |
| What you can share | A browser tab, a window, or your entire screen |
| Audio | Your microphone. Sound from your computer, like notifications or music, is not recorded |
| Camera | Optional round bubble in the bottom-right corner of every step clip |
| Countdown | Off, 3, 5, or 10 seconds |
| Floating controls | Chrome and Edge: pause, mute, and stop from a small window on top of your apps |
| Browsers | Desktop Chrome, Edge, Firefox, and Safari |
| Devices | Computers only. On phones and tablets, film physical work with the camera and upload the video |
| After you stop | Watch, download, or re-record, then generate the SOP |
- Uploads still work. Already have recordings from Teams, Zoom, or another tool? Upload them as before. See how to convert meeting recordings into SOPs and 3 ways to convert existing videos.
- No click auto-capture. SOPX records a video of your screen. It does not run a browser extension that captures each click as a screenshot.
- Free tool without an account. Need a quick recording outside SOPX? Our free screen recorder works in the browser with no sign-up.
Getting started
- Pick one software process that new hires ask about the most.
- Click New Procedure > Record screen, turn on your microphone, and record it once while you explain each step.
- Stop, name the procedure, and let AI build the SOP. Review it and publish.
For the bigger picture of how AI builds SOPs from recordings and documents, see how to create SOPs and work instructions with AI. Or start a free trial and record your first procedure today.