
Product & Company ·
Timed Video Annotations and Photo Editing for SOPs
Fix sideways phone photos and point at the right second of a video, right in your SOP. Rotate, crop and add arrows that show only while they matter.

Table of contents
TL;DR
You can now edit photos and annotate videos right inside SOPX. Click Edit image under a step photo to rotate it, straighten it and crop it. On a step video, click Annotate clip to add a box, arrow, circle, text or numbered callout. Each one shows only for the seconds you pick, so it points at the right thing at the right time. Each clip also has a Detail: a still picture you choose and mark up. The original photo and video are always kept, so you can change or reset any edit. It works on every plan.
| New tool | What it does | Where to find it |
|---|---|---|
| Edit image | Rotate, straighten and crop a step photo | Under every step photo |
| Timed video annotations | Arrows and boxes that show only for a few seconds of the clip | Video tab > Annotate clip |
| Detail | A still picture for each clip, which you can crop and mark up | Detail tab > Edit detail |
Two small problems that waste real time
Photos from the shop floor often come out wrong. They are sideways. They are tilted. Or they show too much.
Until now, you had to fix them in another app. Then you uploaded them again.
Videos had a problem too. A video shows the whole job. But the important part may last only two seconds. An arrow on the whole video points at the wrong thing most of the time.
Our customers asked us to fix both. Now you can, without leaving the SOPX.
| The problem | Before | Now in SOPX |
|---|---|---|
| The phone photo is sideways or tilted | Fix it in another app, then upload again | Click Edit image, rotate and straighten |
| The photo shows too much | Crop it somewhere else | Crop it in the step, with a shape or by hand |
| The key moment in the video is only 2 seconds | One arrow on the whole video, or none | An arrow that shows only during those 2 seconds |
| The still picture before you press play | Always a frame of the video, as it was | A Detail you pick, crop and mark up |
Edit image: rotate, straighten, crop
Under every step photo there is a new Edit image button. It sits next to Annotate.
Here is a photo as it was uploaded. It is sideways and tilted.
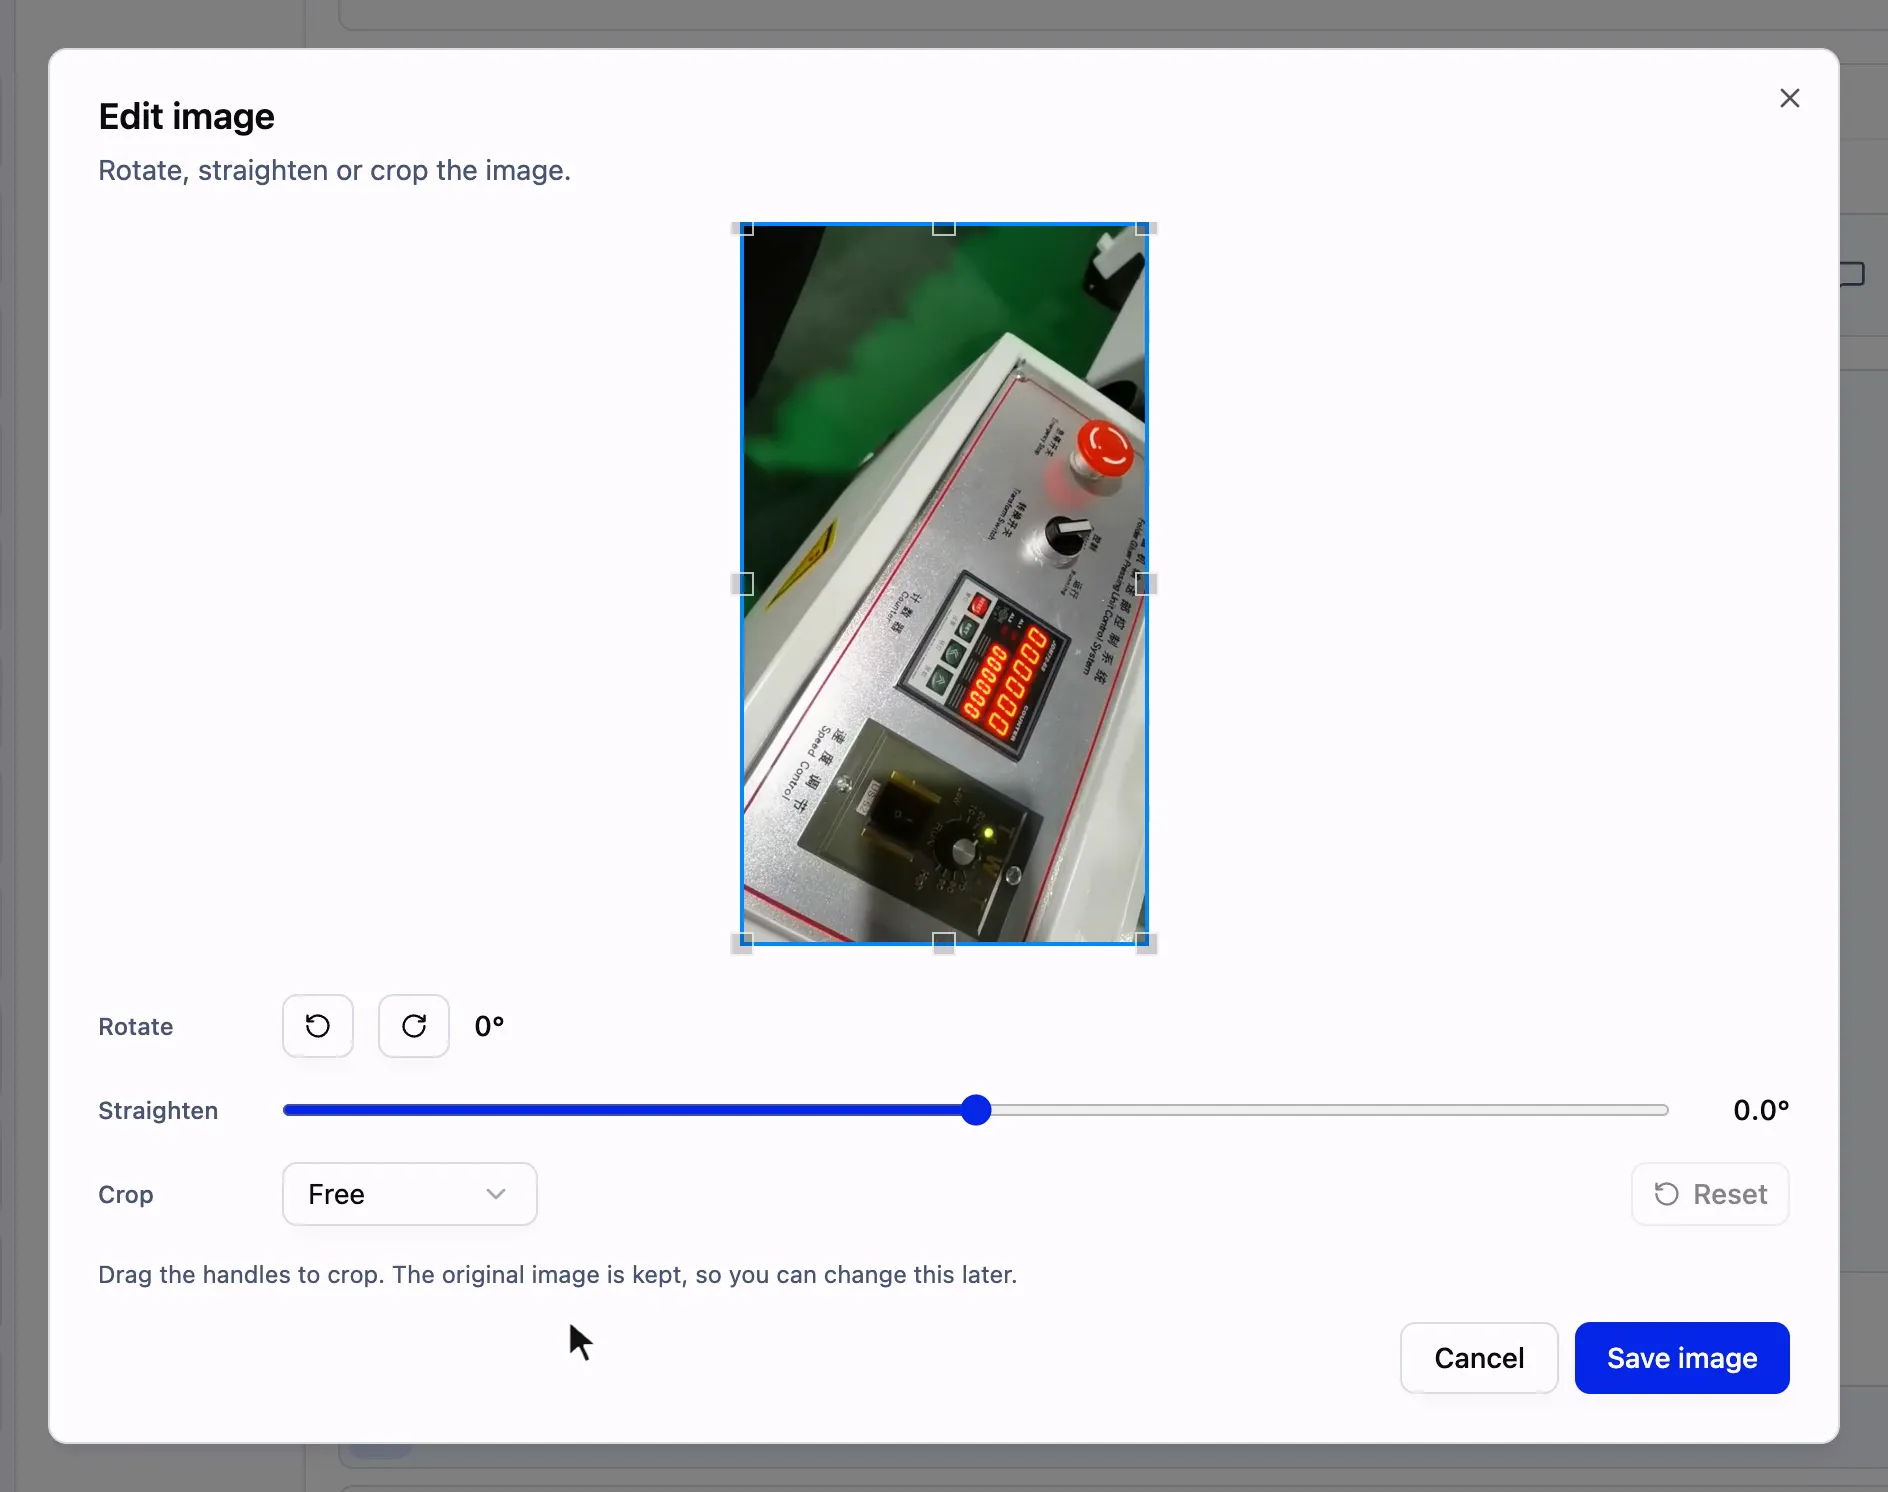
The photo as it came from the phone.
And here it is after three quick fixes.
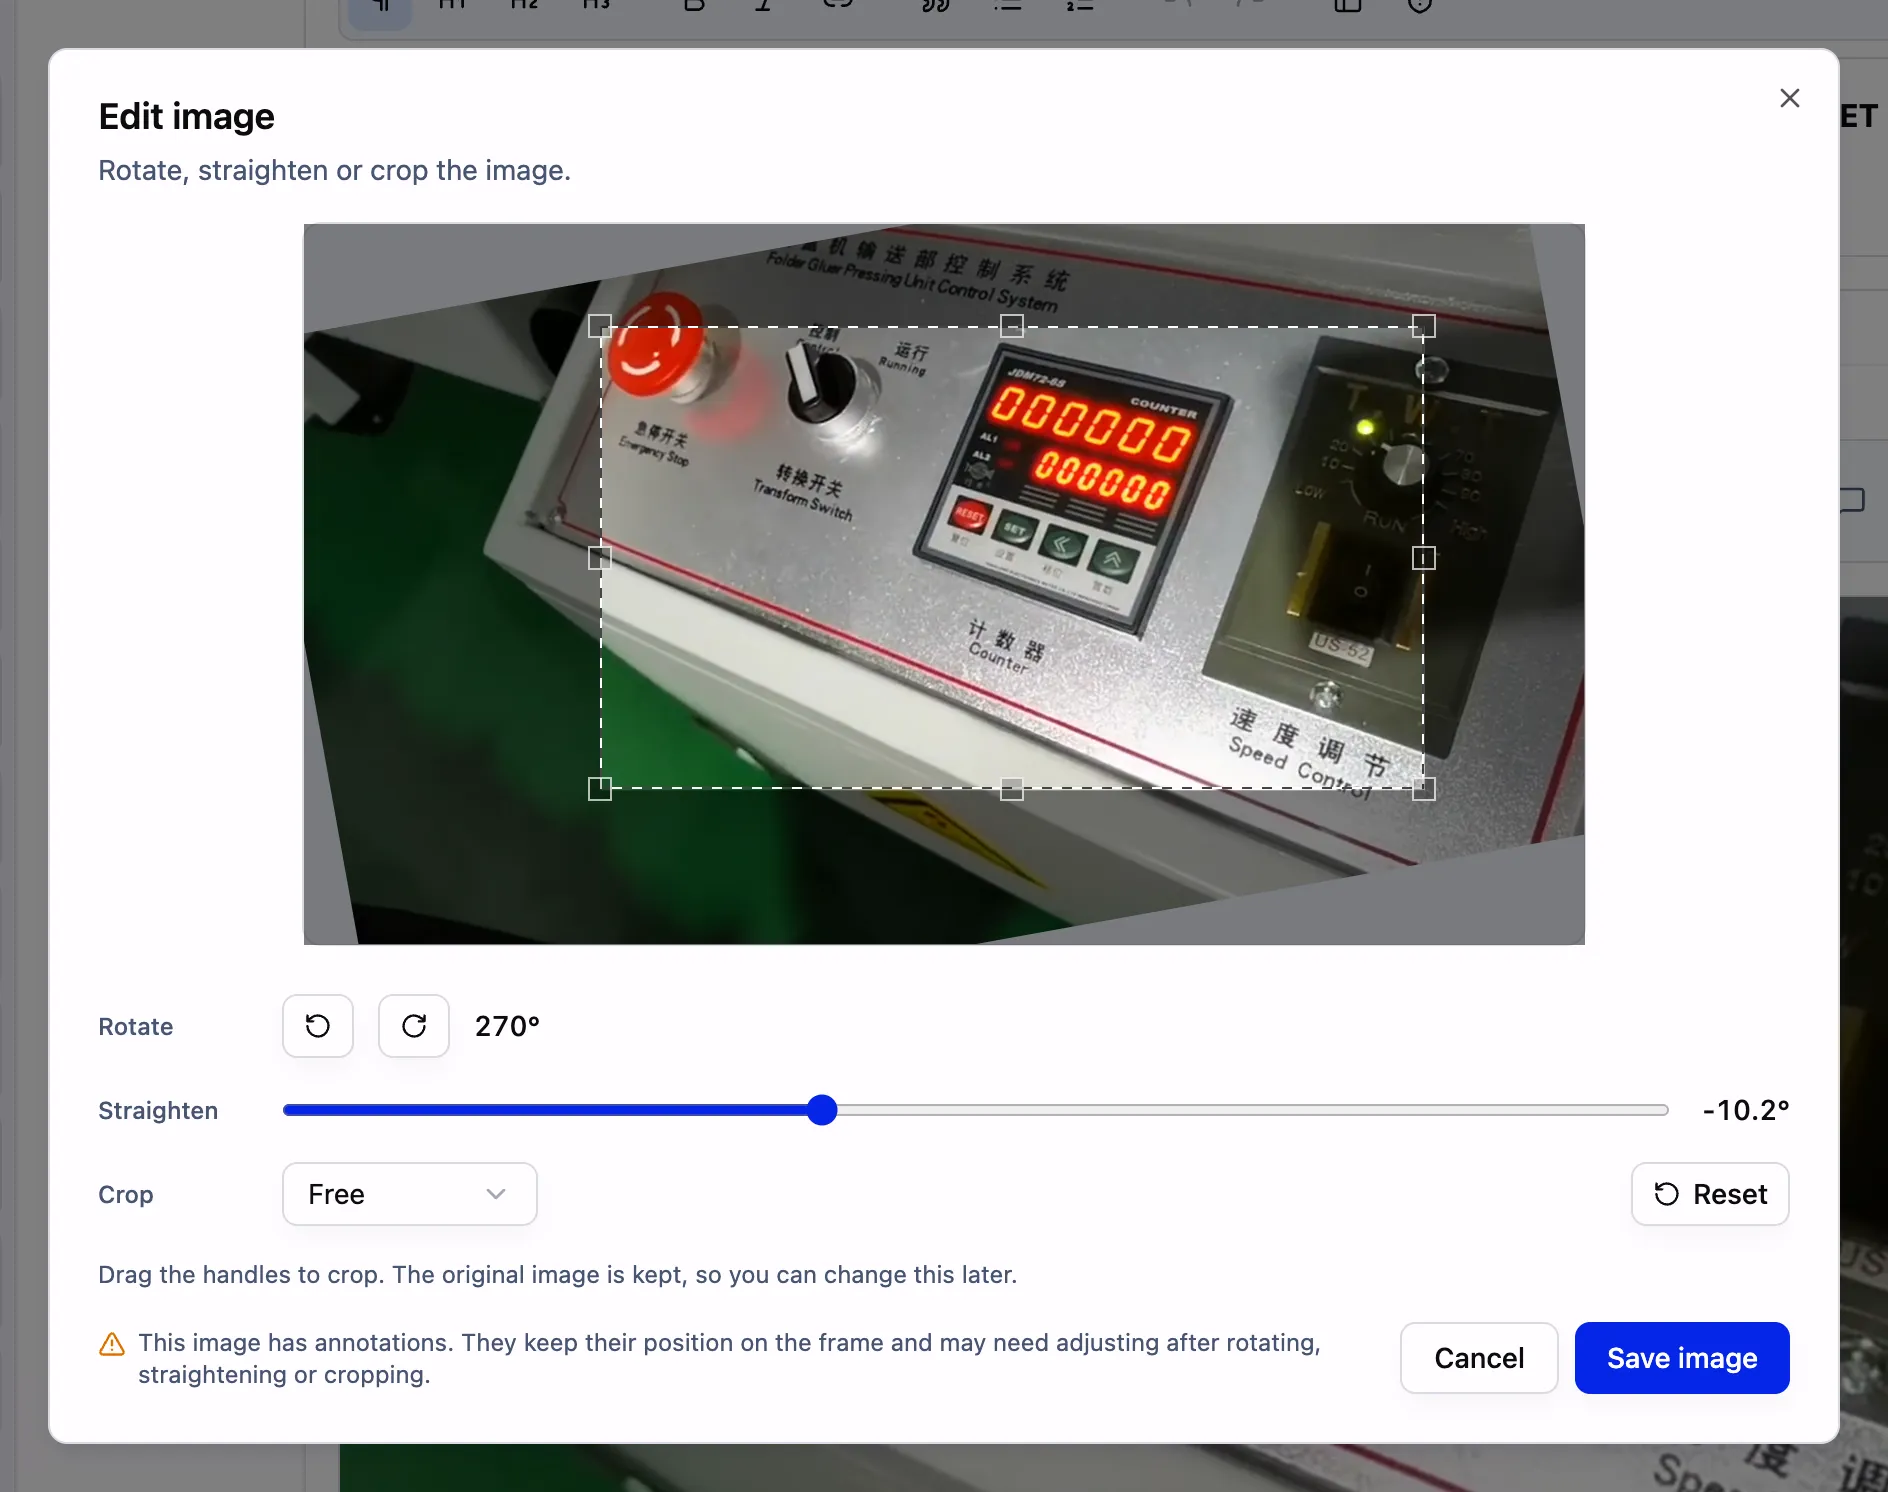
Rotated, straightened by -10.2°, and cropped to the counter.
Watch the whole edit in 13 seconds:
Rotate, straighten, crop, then annotate.
What each control does
| Control | What it does |
|---|---|
| Rotate | Turns the photo a quarter turn left or right |
| Straighten | A slider from -45° to 45°, in steps of 0.1°. SOPX crops for you, so there are no empty corners |
| Crop | Drag the handles. A grid helps you line things up |
| Shape | Free, Original, Square, 4:3, 16:9, 3:4 or 9:16 |
| Reset | Brings back the whole original photo |
A few more good things to know:
- The original is kept. You can change the edit or reset it at any time.
- One edit, one place. Is the same photo used in another step? That step does not change.
- It works on a phone. You can edit with touch.
- Phone photos stand up. Some phones save photos sideways and use a hidden tag to turn them. Those photos now always show upright, also in exports.
Annotate the edited photo
Click Annotate after you edit. It opens the edited photo, not the original.
In this example, there is a box around the counter display. Then two numbered callouts point at the RESET and SET buttons.
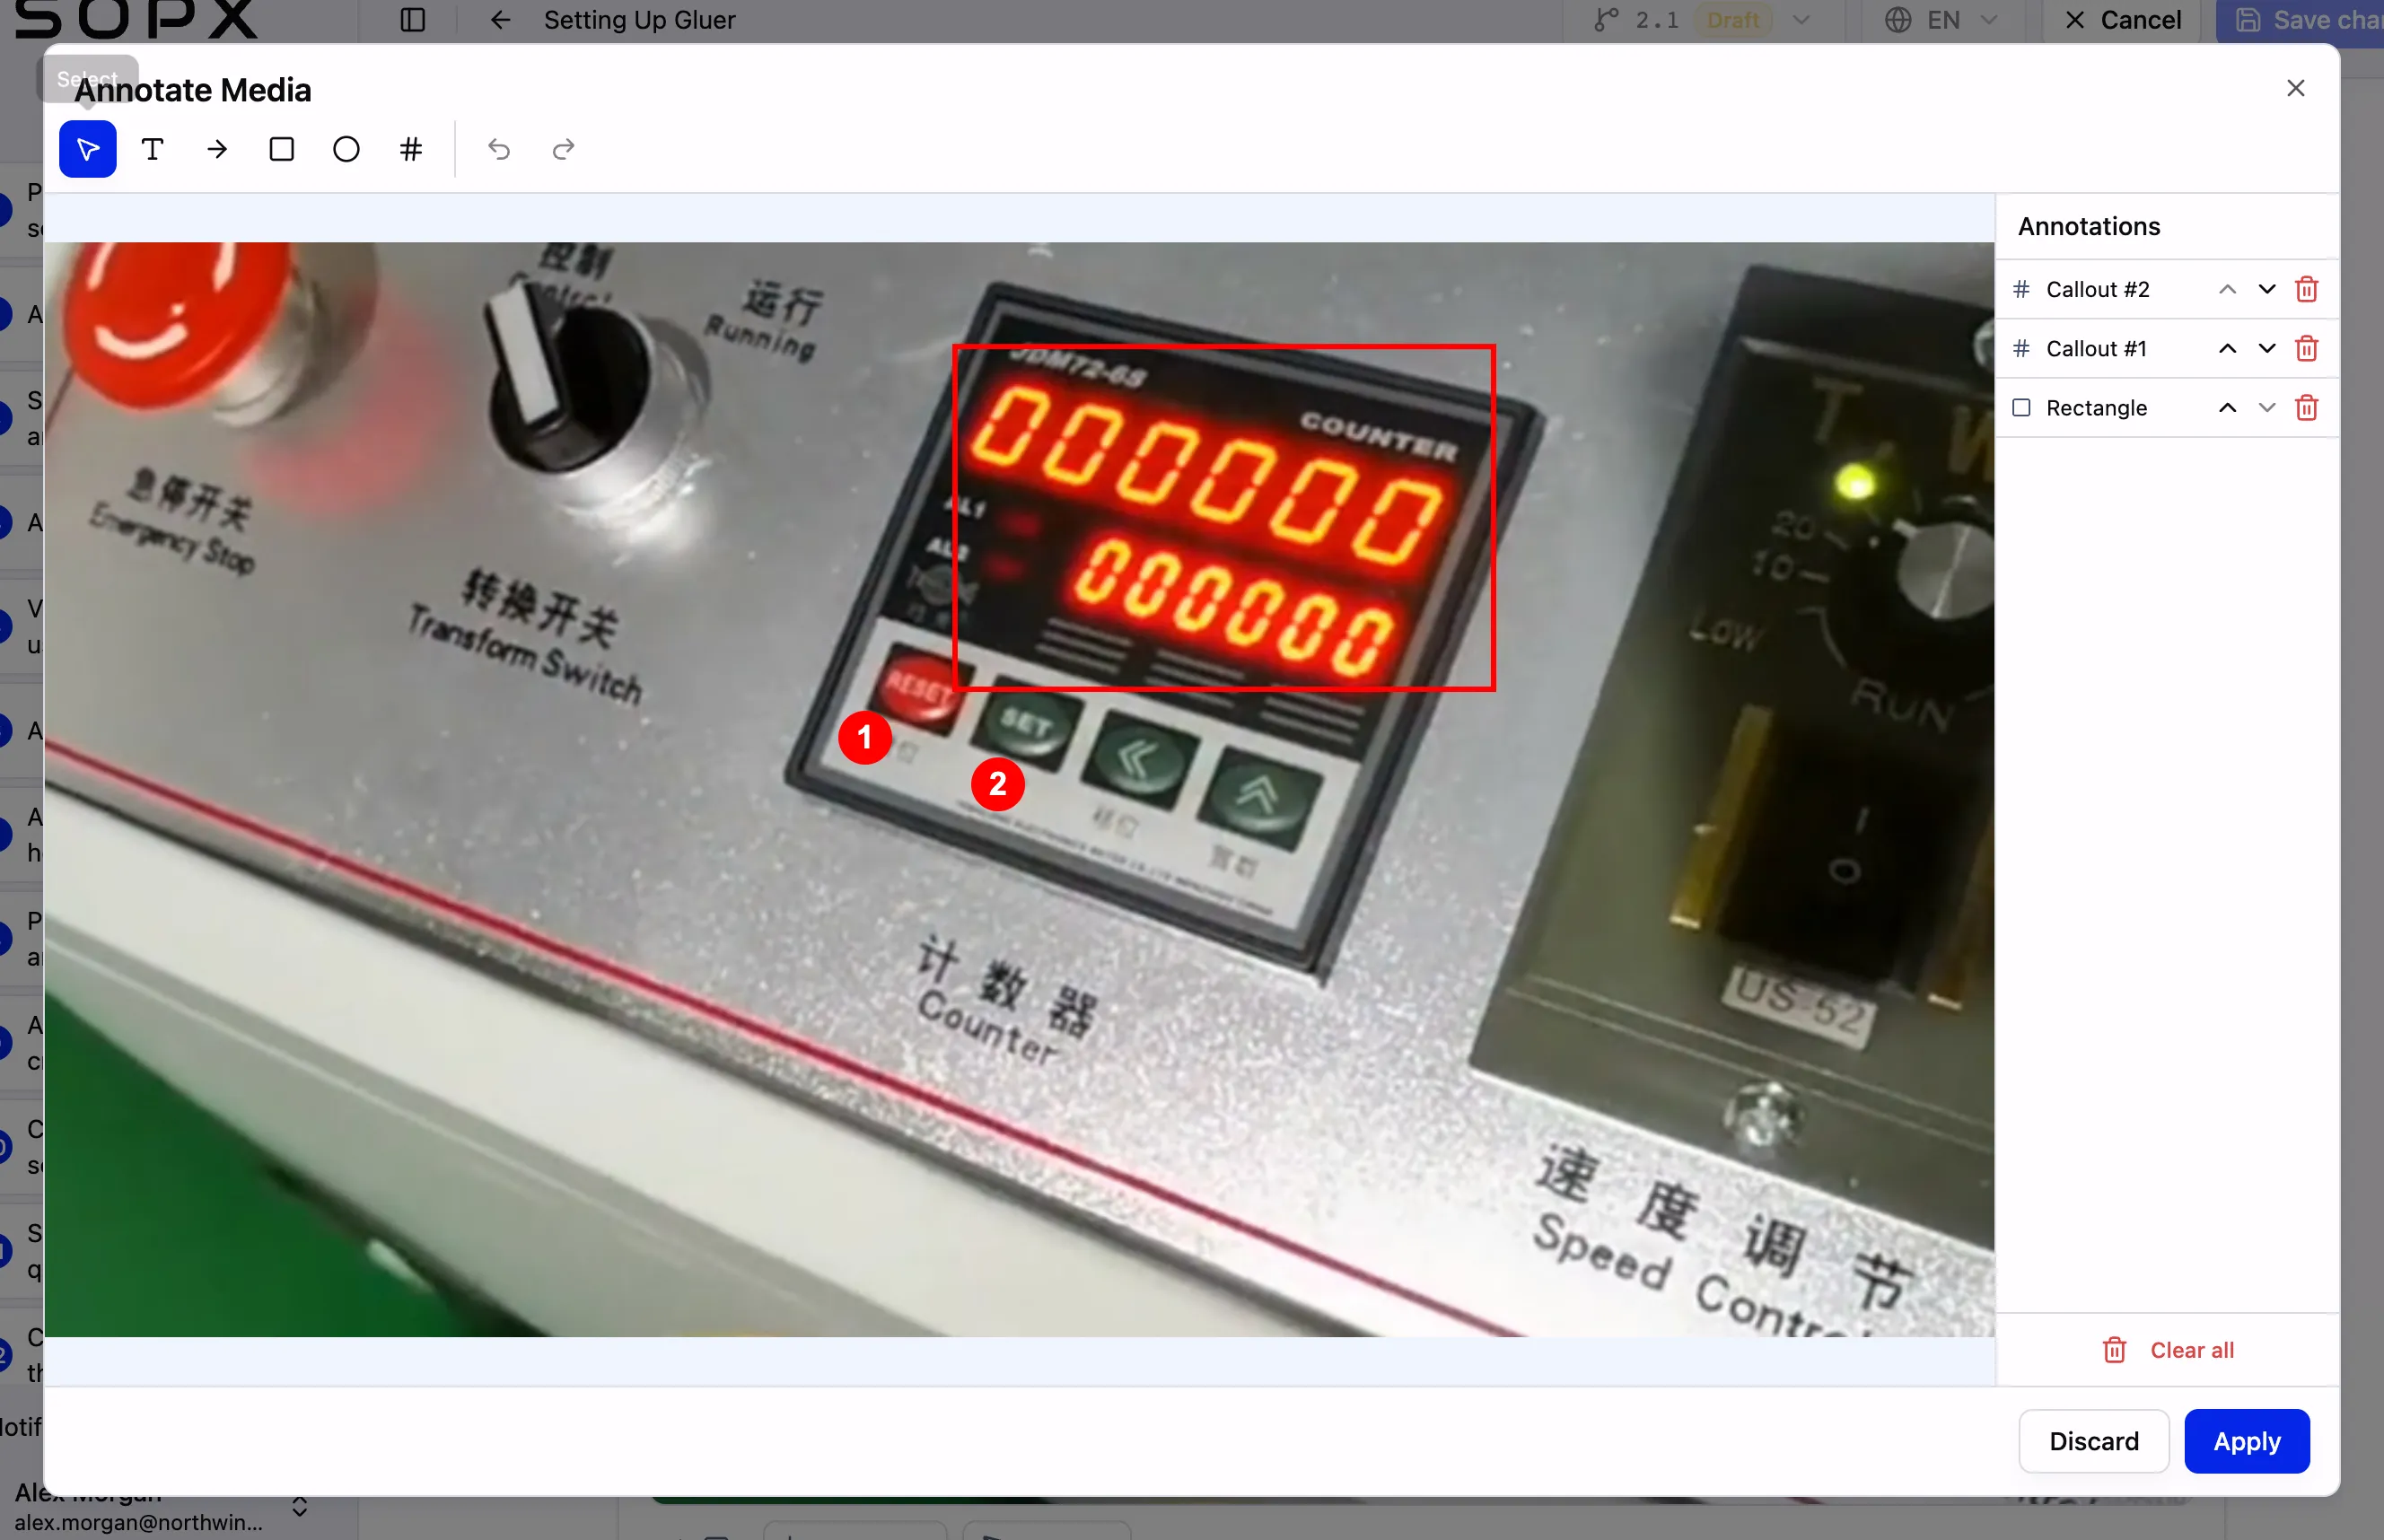
A box and two callouts on the edited photo.
The step text uses the same numbers. So the reader knows what to press first.
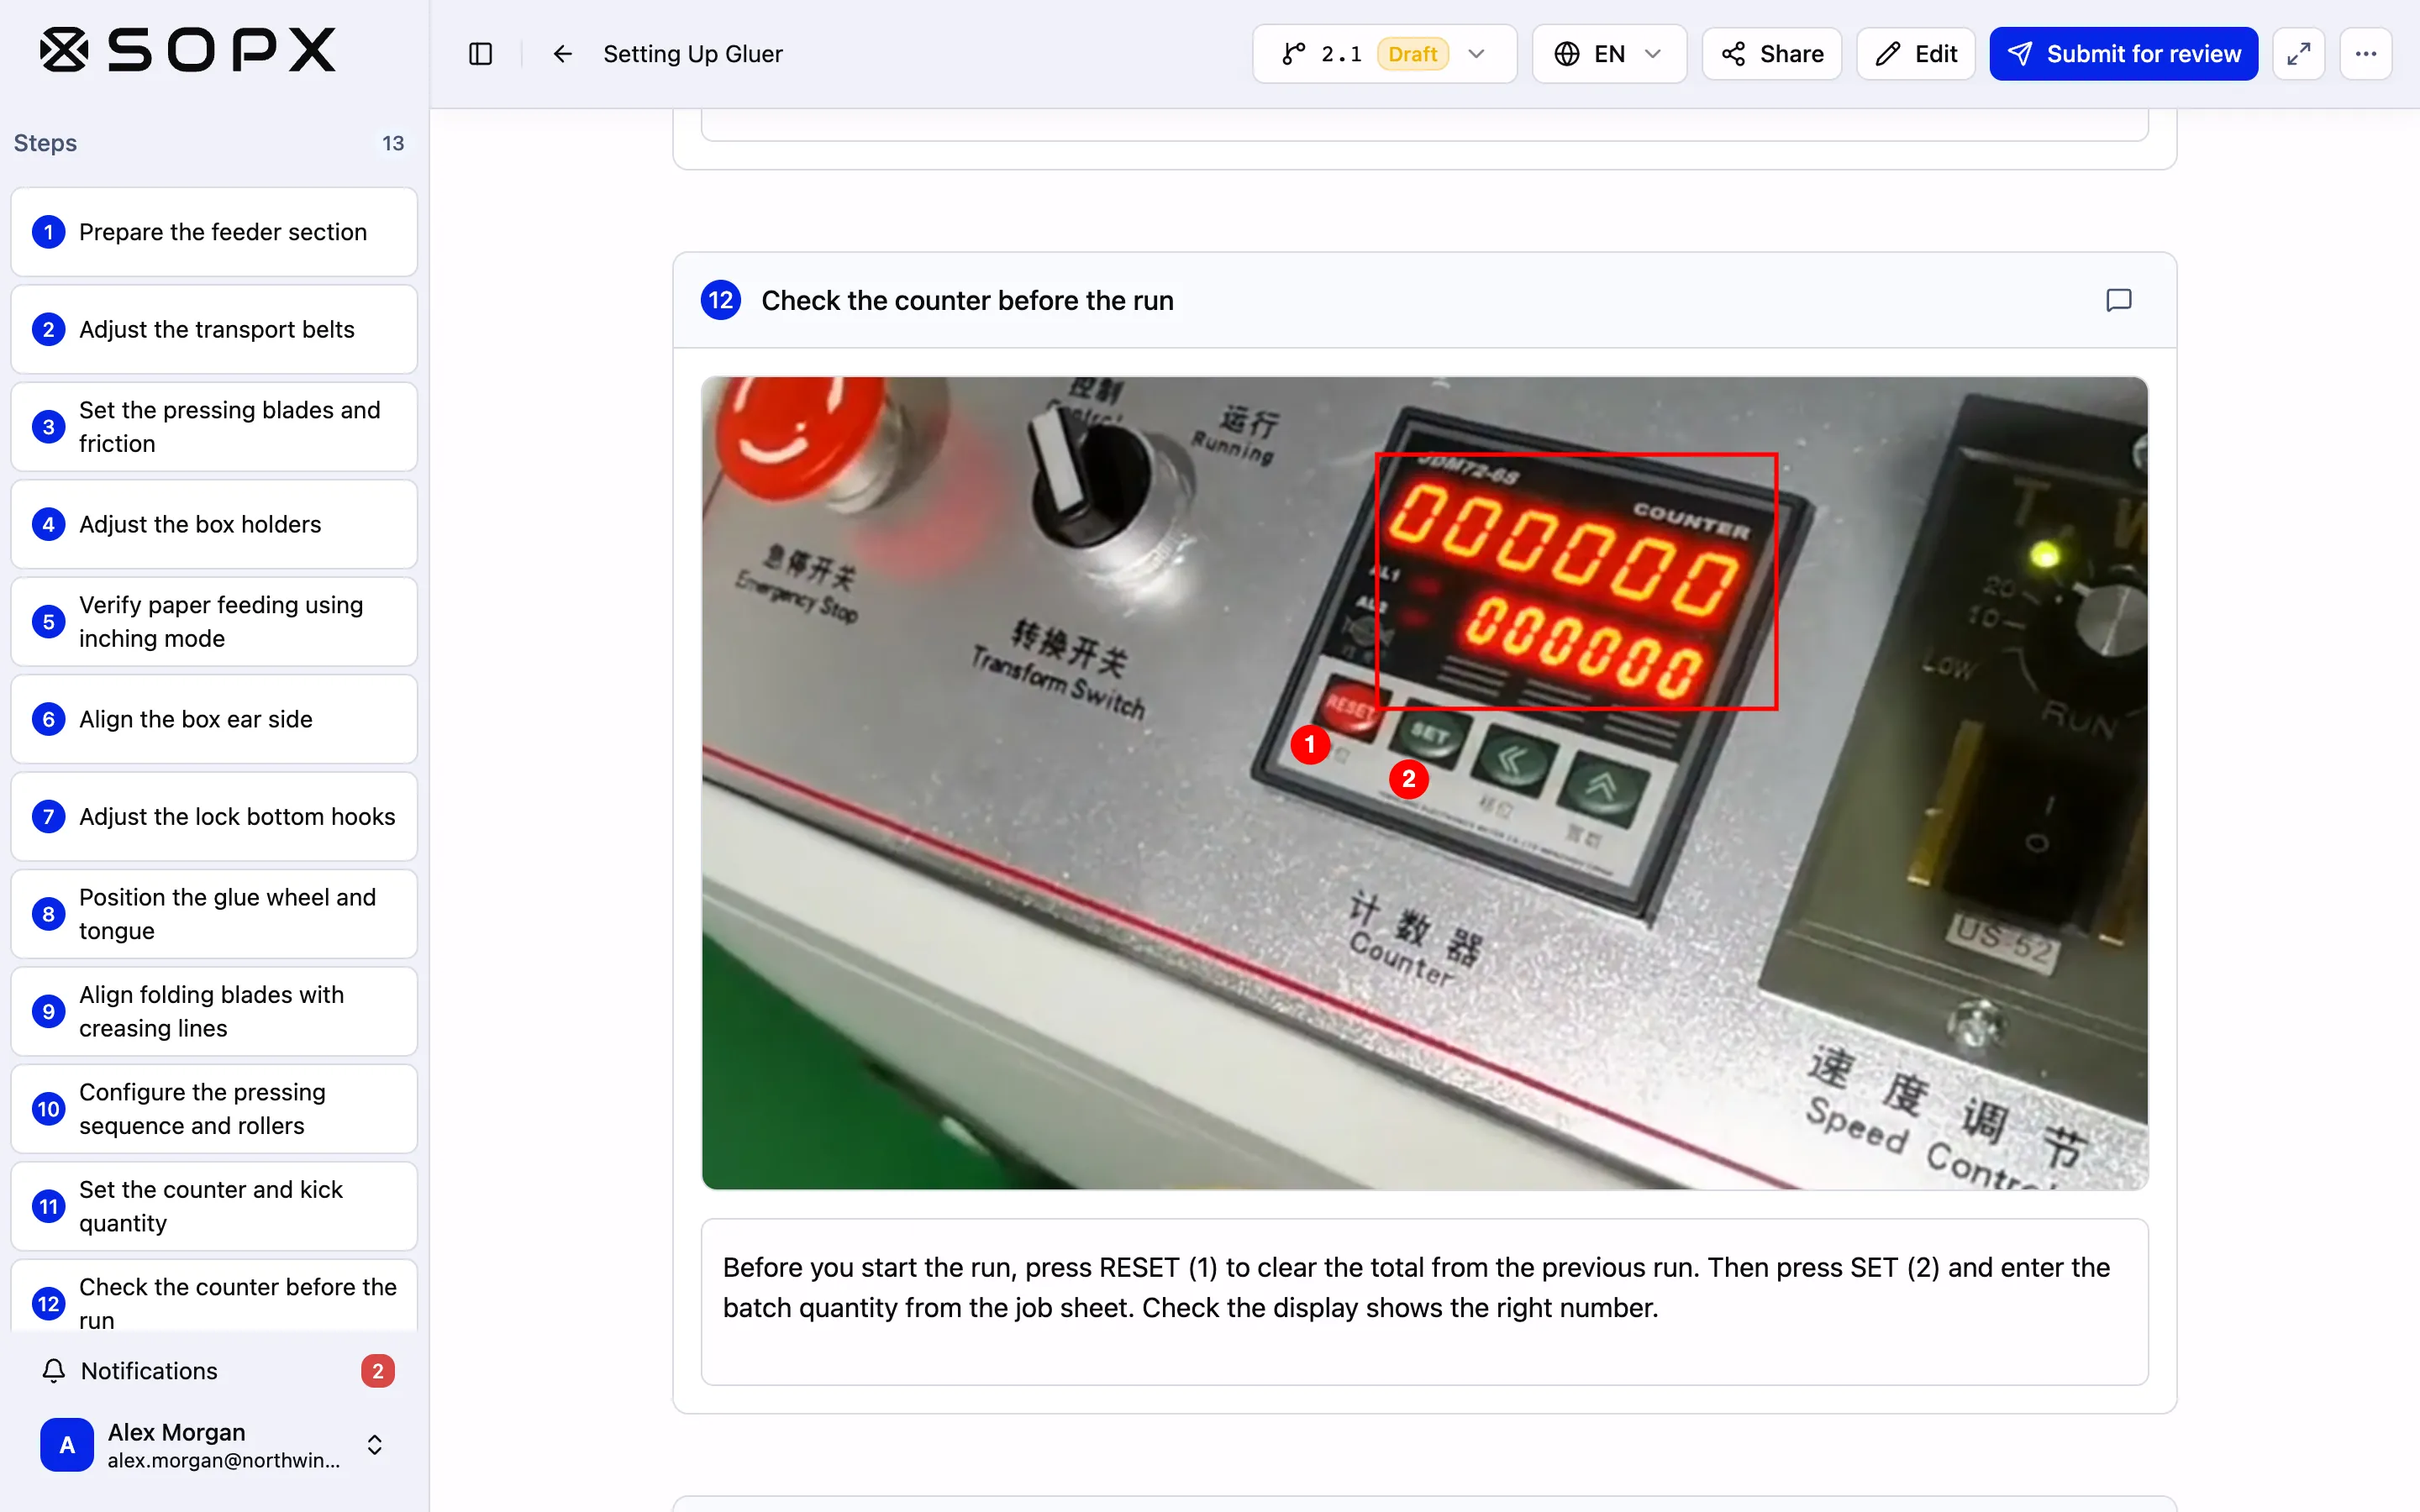
What the reader sees: one clear photo and short text.
Did you edit a photo that already had annotations? SOPX tells you. The annotations stay where they were, so you may need to move them a little.
Timed video annotations
Every clip now has two tabs: Video and Detail.
The Video tab has three controls:
- Edit clip to trim, change speed, zoom or rotate.
- Annotate clip to add timed annotations.
- Mute video to turn off the sound.
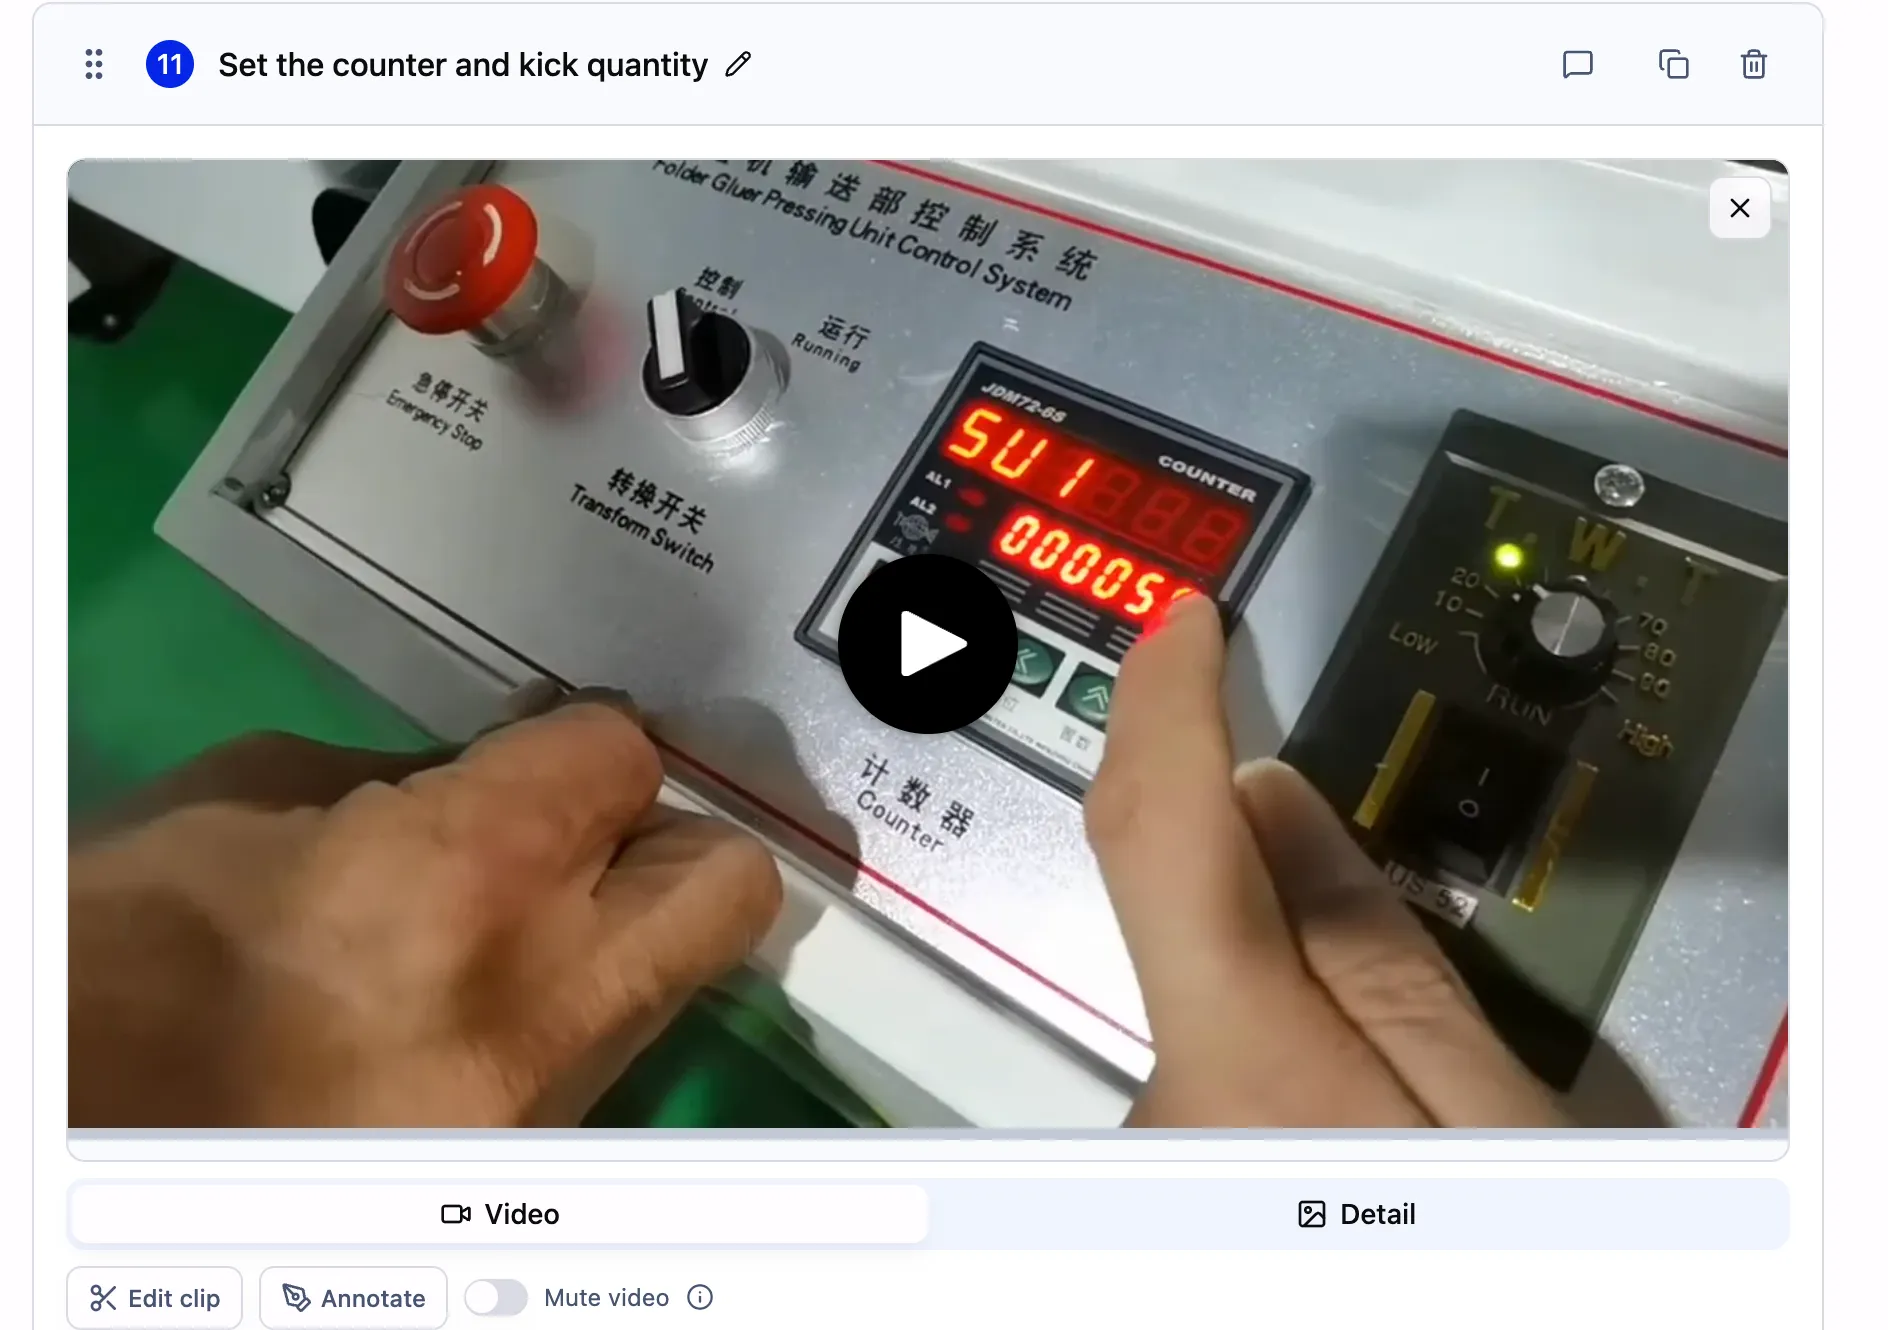
The new Video and Detail tabs on a clip.
How to add a timed annotation
- Click Annotate clip on the Video tab. Annotate video opens.
- Pause the video where the annotation should start.
- Draw a box, ellipse, arrow, text or numbered callout.
- A bar appears on the timeline under the video. Drag it to move it. Drag its ends to change when it starts and ends.
- Need exact timing? Type the Start and End times. Or press - and + to move one frame at a time.
- Click Apply.
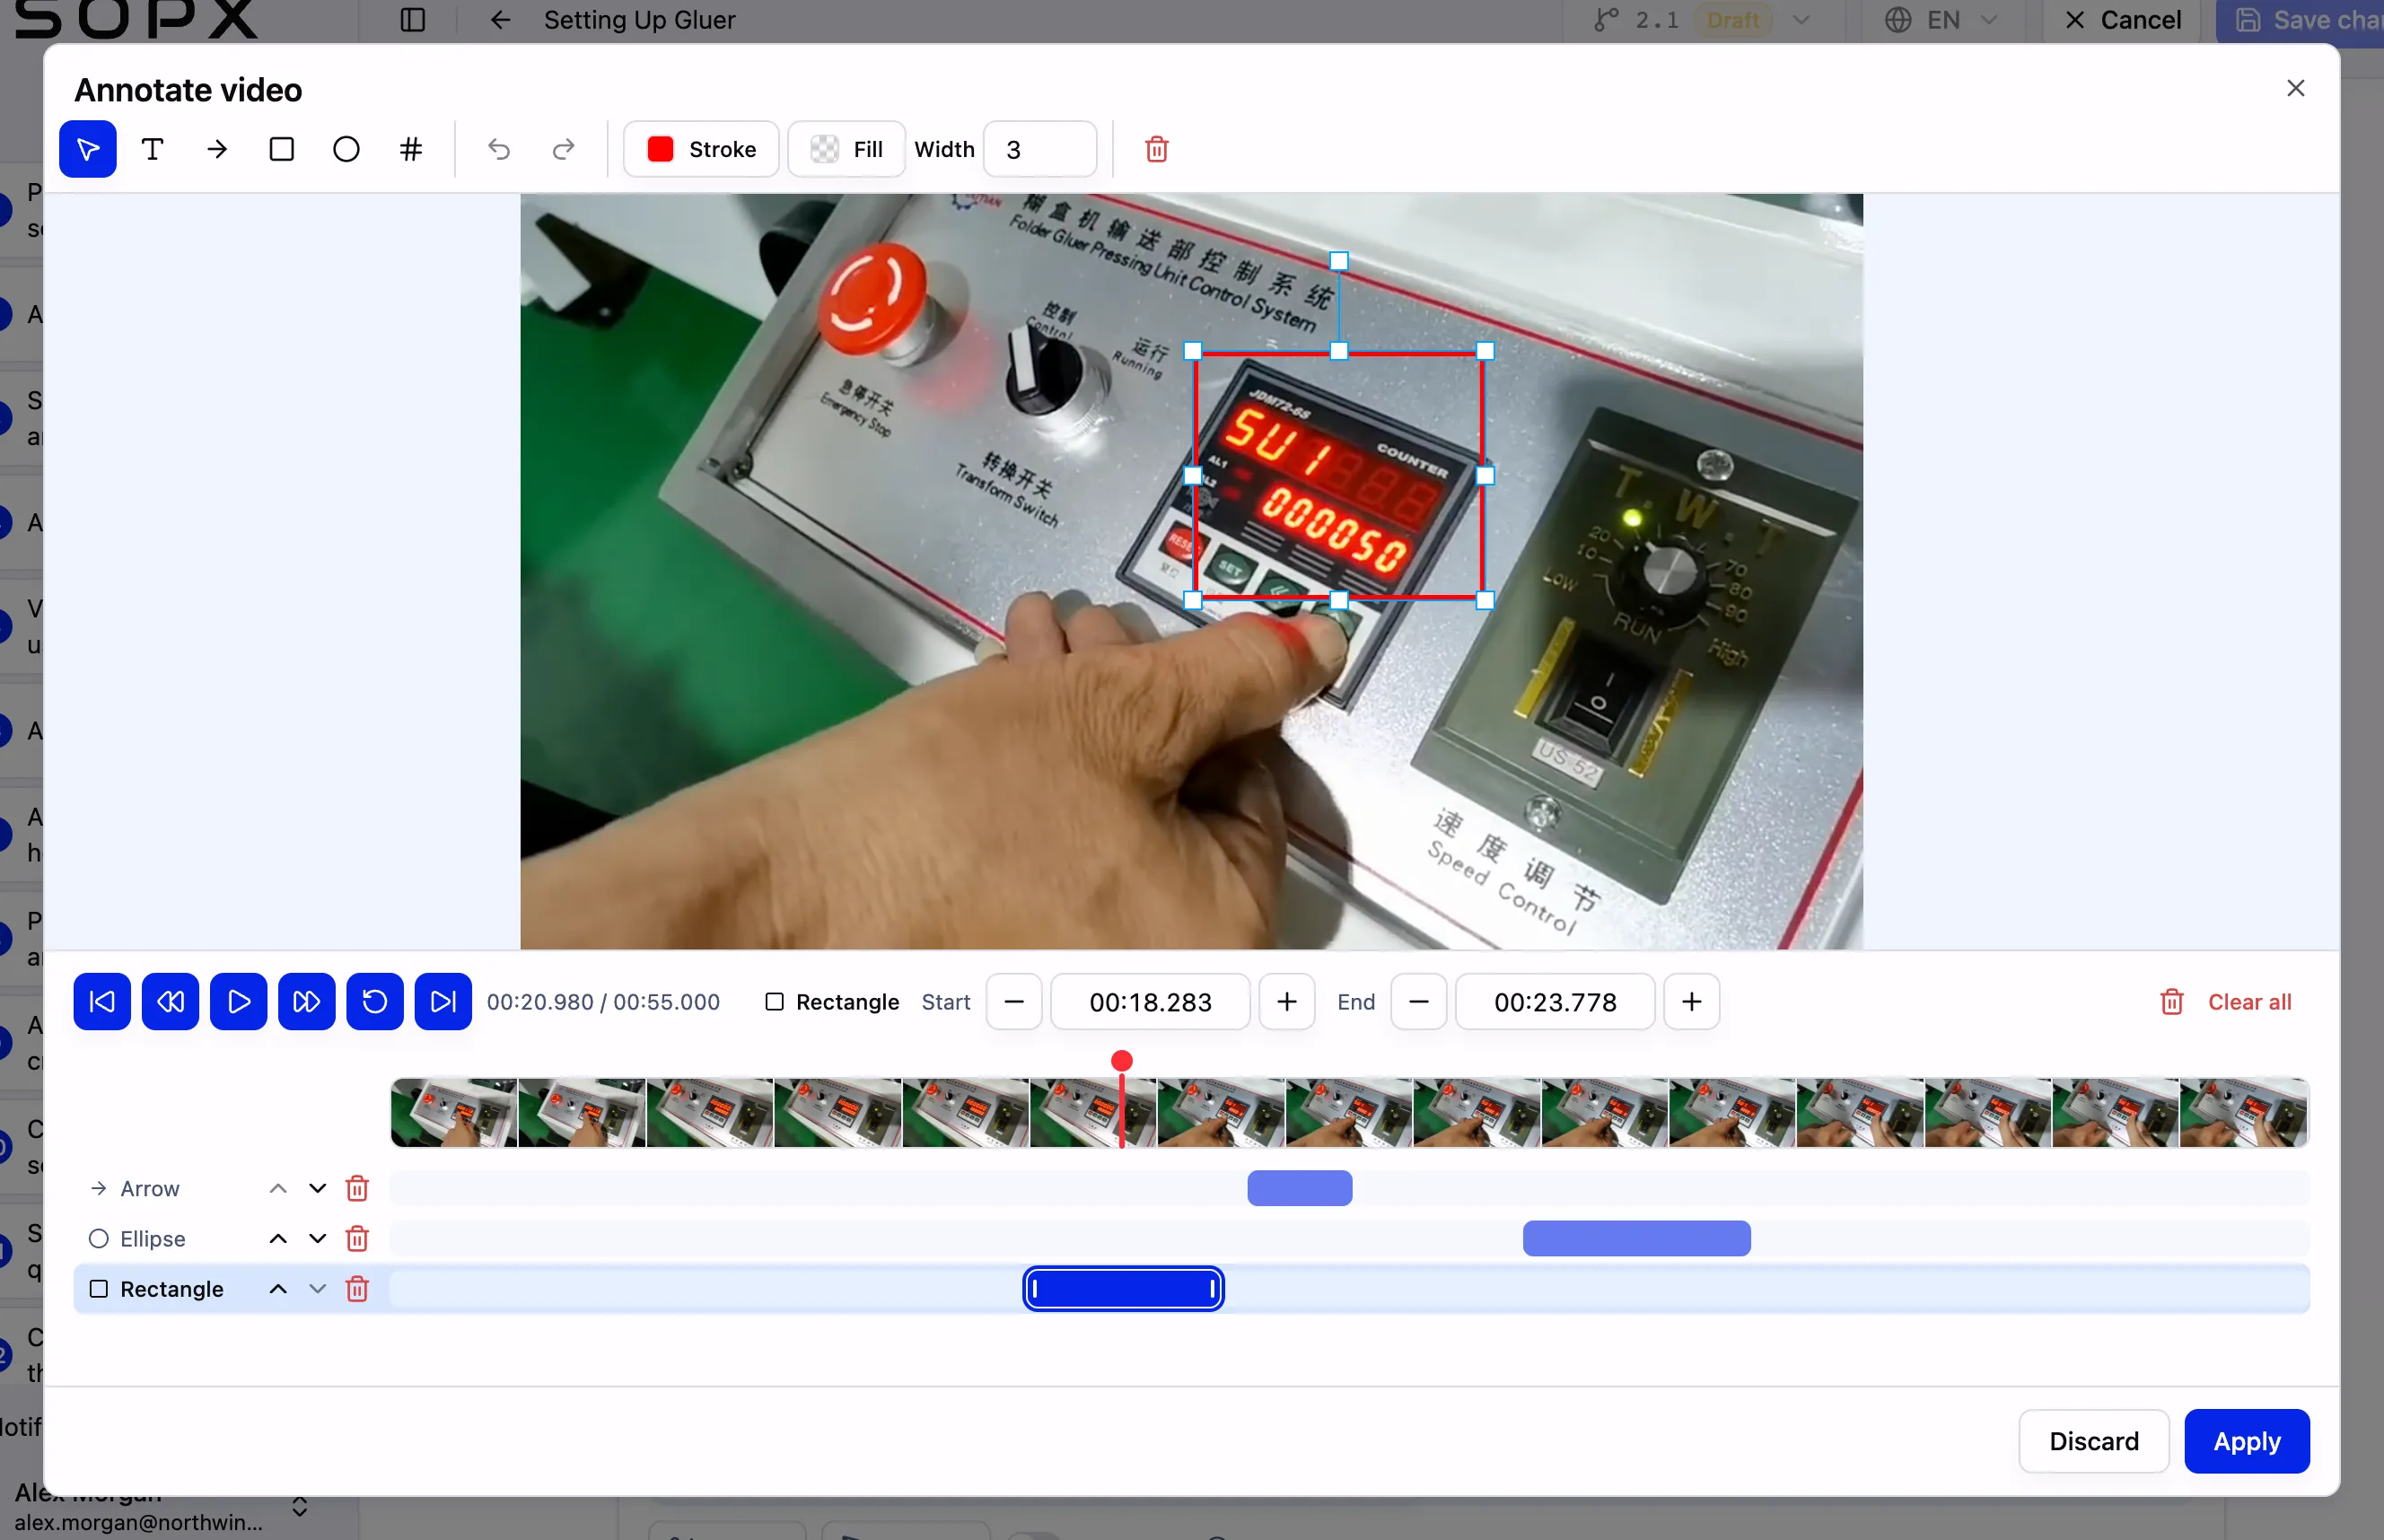
Each annotation gets its own row and its own time bar.
An example: three annotations, one after another
In the gluer video, the operator sets two numbers. Three annotations guide the eye:
| Annotation | Shows from | What happens in the video |
|---|---|---|
| Box | 0:18 to 0:23 | The operator sets the batch quantity |
| Arrow | 0:24 to 0:27 | The operator presses SET to confirm |
| Ellipse | 0:32 to 0:39 | The operator sets the kick quantity |
Watch it in 14 seconds. The arrow is added in one drag. Then the three annotations come and go as the video plays.
Timed annotations appear and disappear with the video.
Handy extras
- Click a bar to jump to that moment.
- Change the order of rows. The top row draws on top.
- Undo any change.
- Trim later? No problem. If you trim the clip, annotations outside it turn grey and say “Outside the clip, won’t show”. Make the clip longer again and they come back.
You add timed annotations on a computer, because dragging a timeline needs a mouse. Everyone can watch them on any device.
The Detail: a still picture for every clip
The Detail tab is the still picture for the clip. It used to be just a frame of the video. Now it is its own picture.
Click Edit detail to:
- Pick any frame of the clip. Scrub to it, or type the time.
- Rotate, straighten and crop it, just like Edit image.
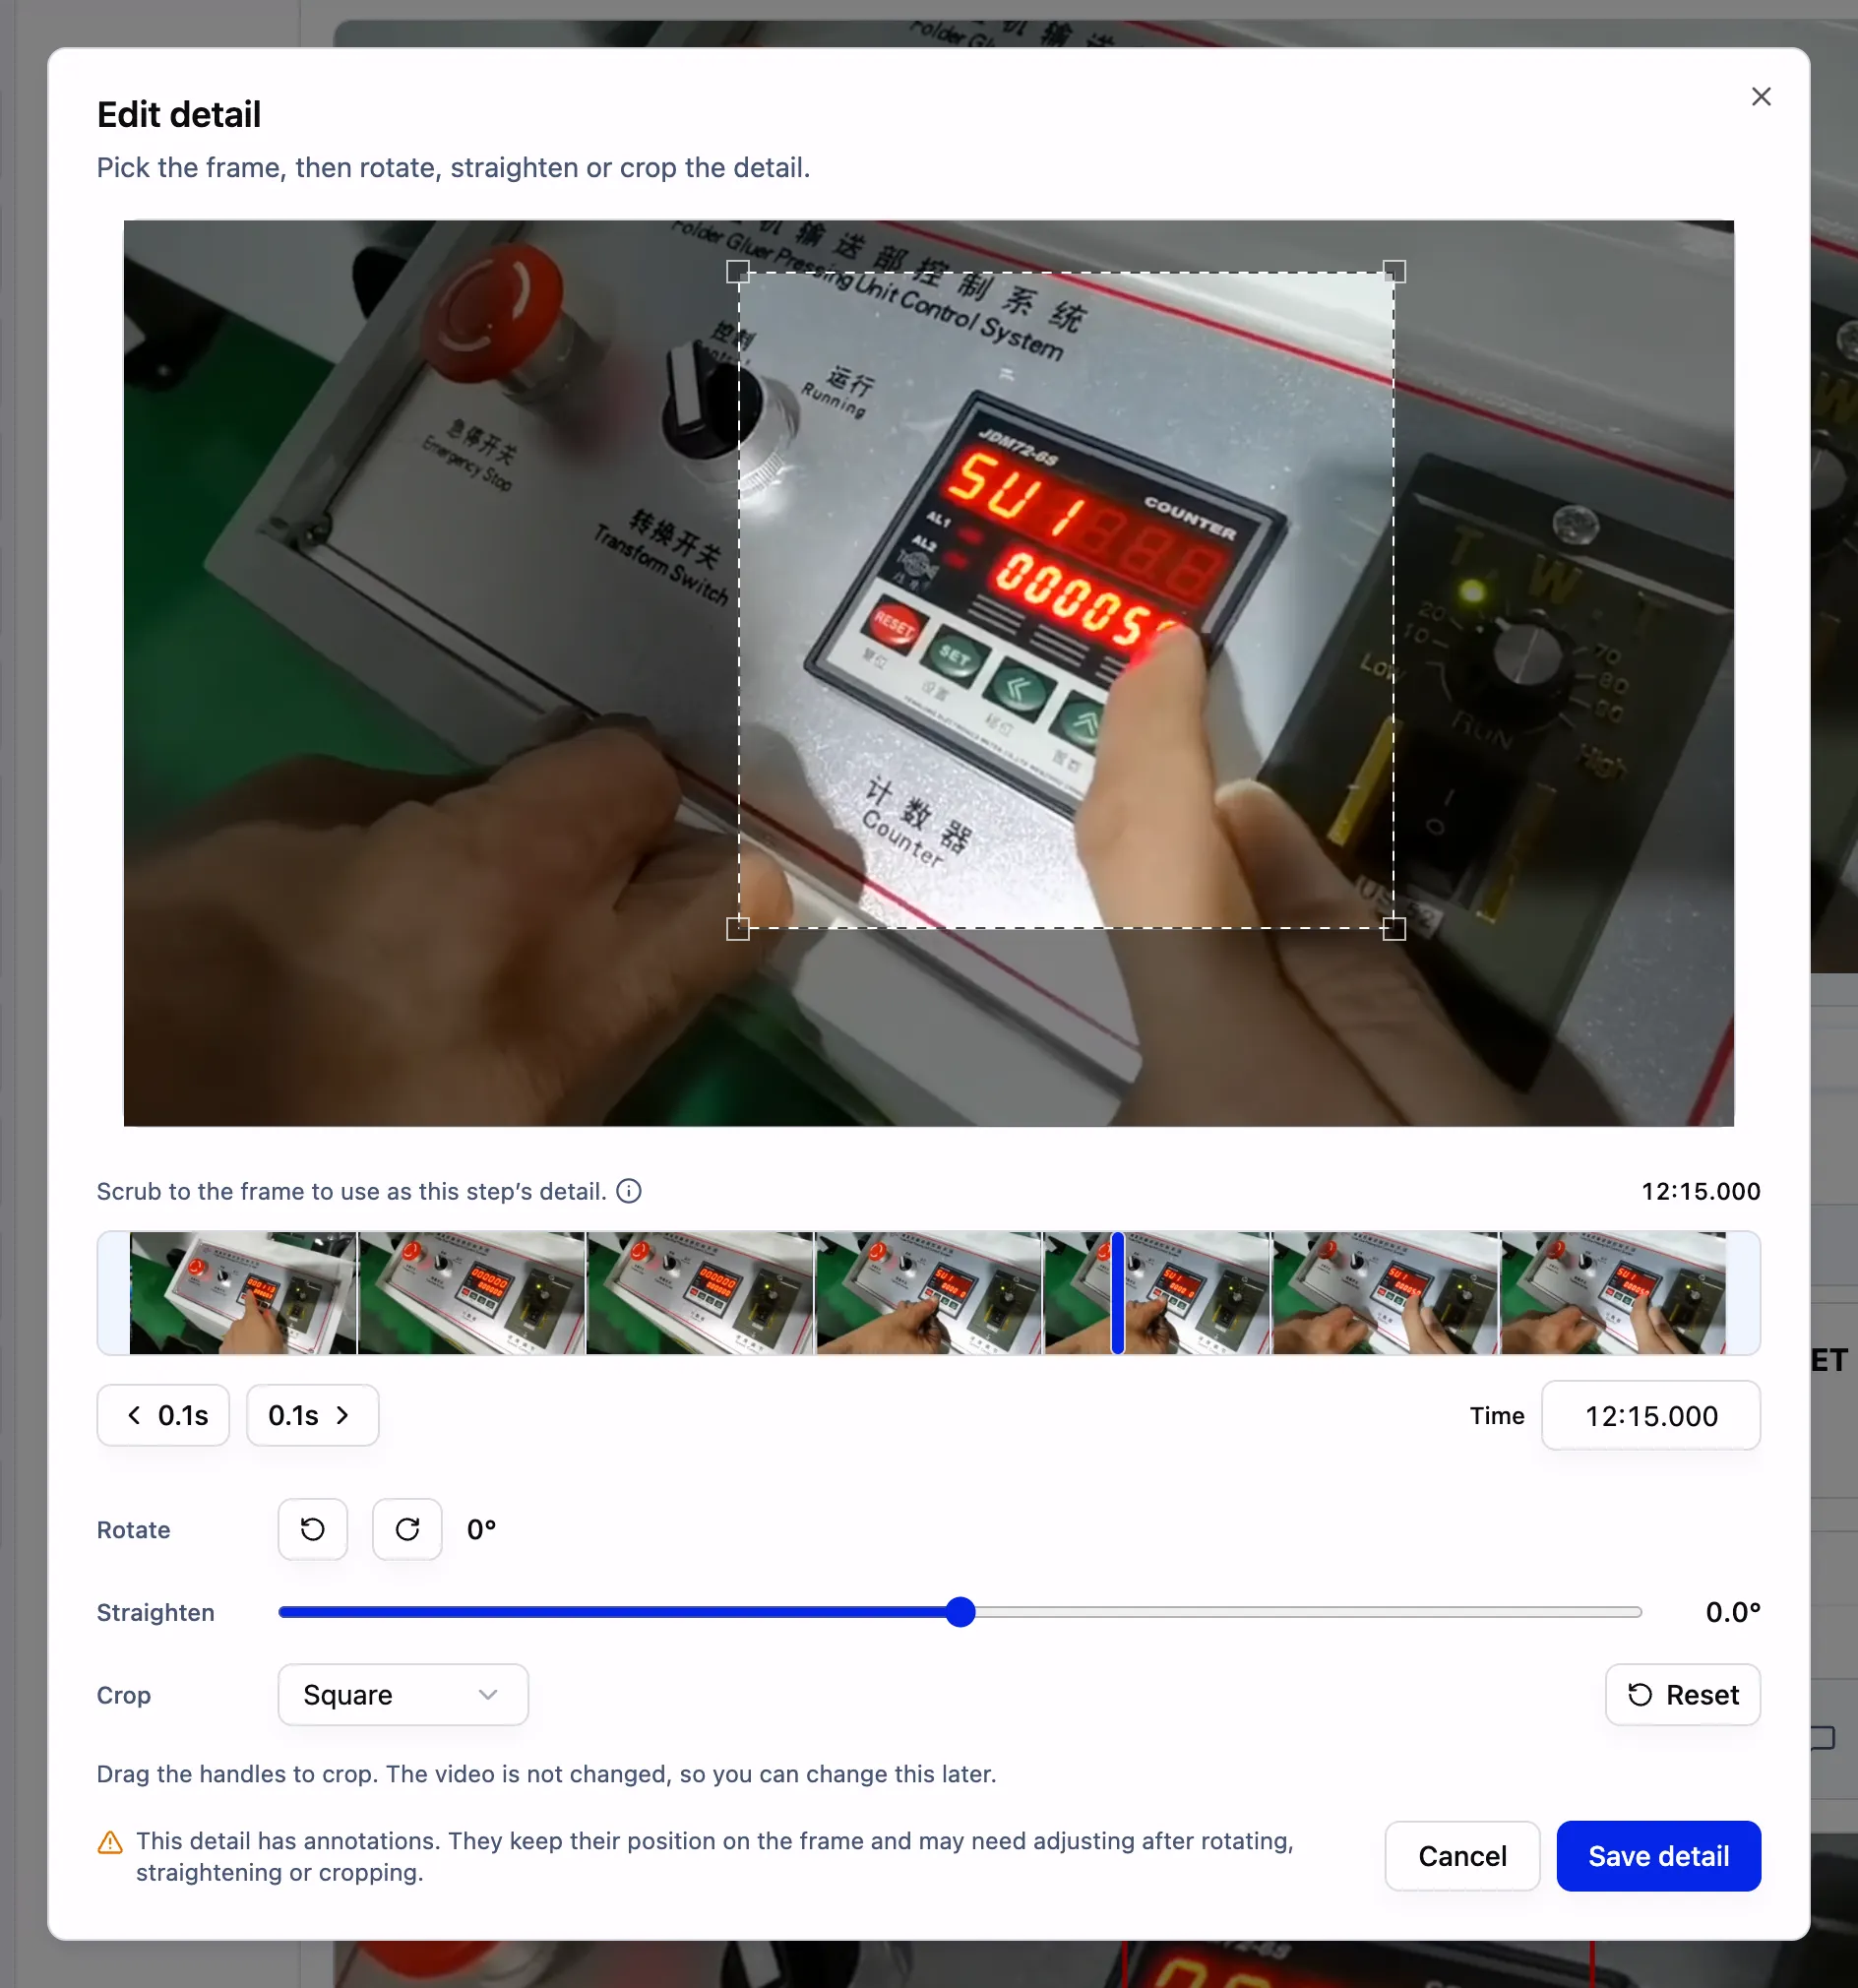
Pick the frame, then crop it square on the counter.
Then click Annotate detail to mark it up. Here, one arrow points at the display.
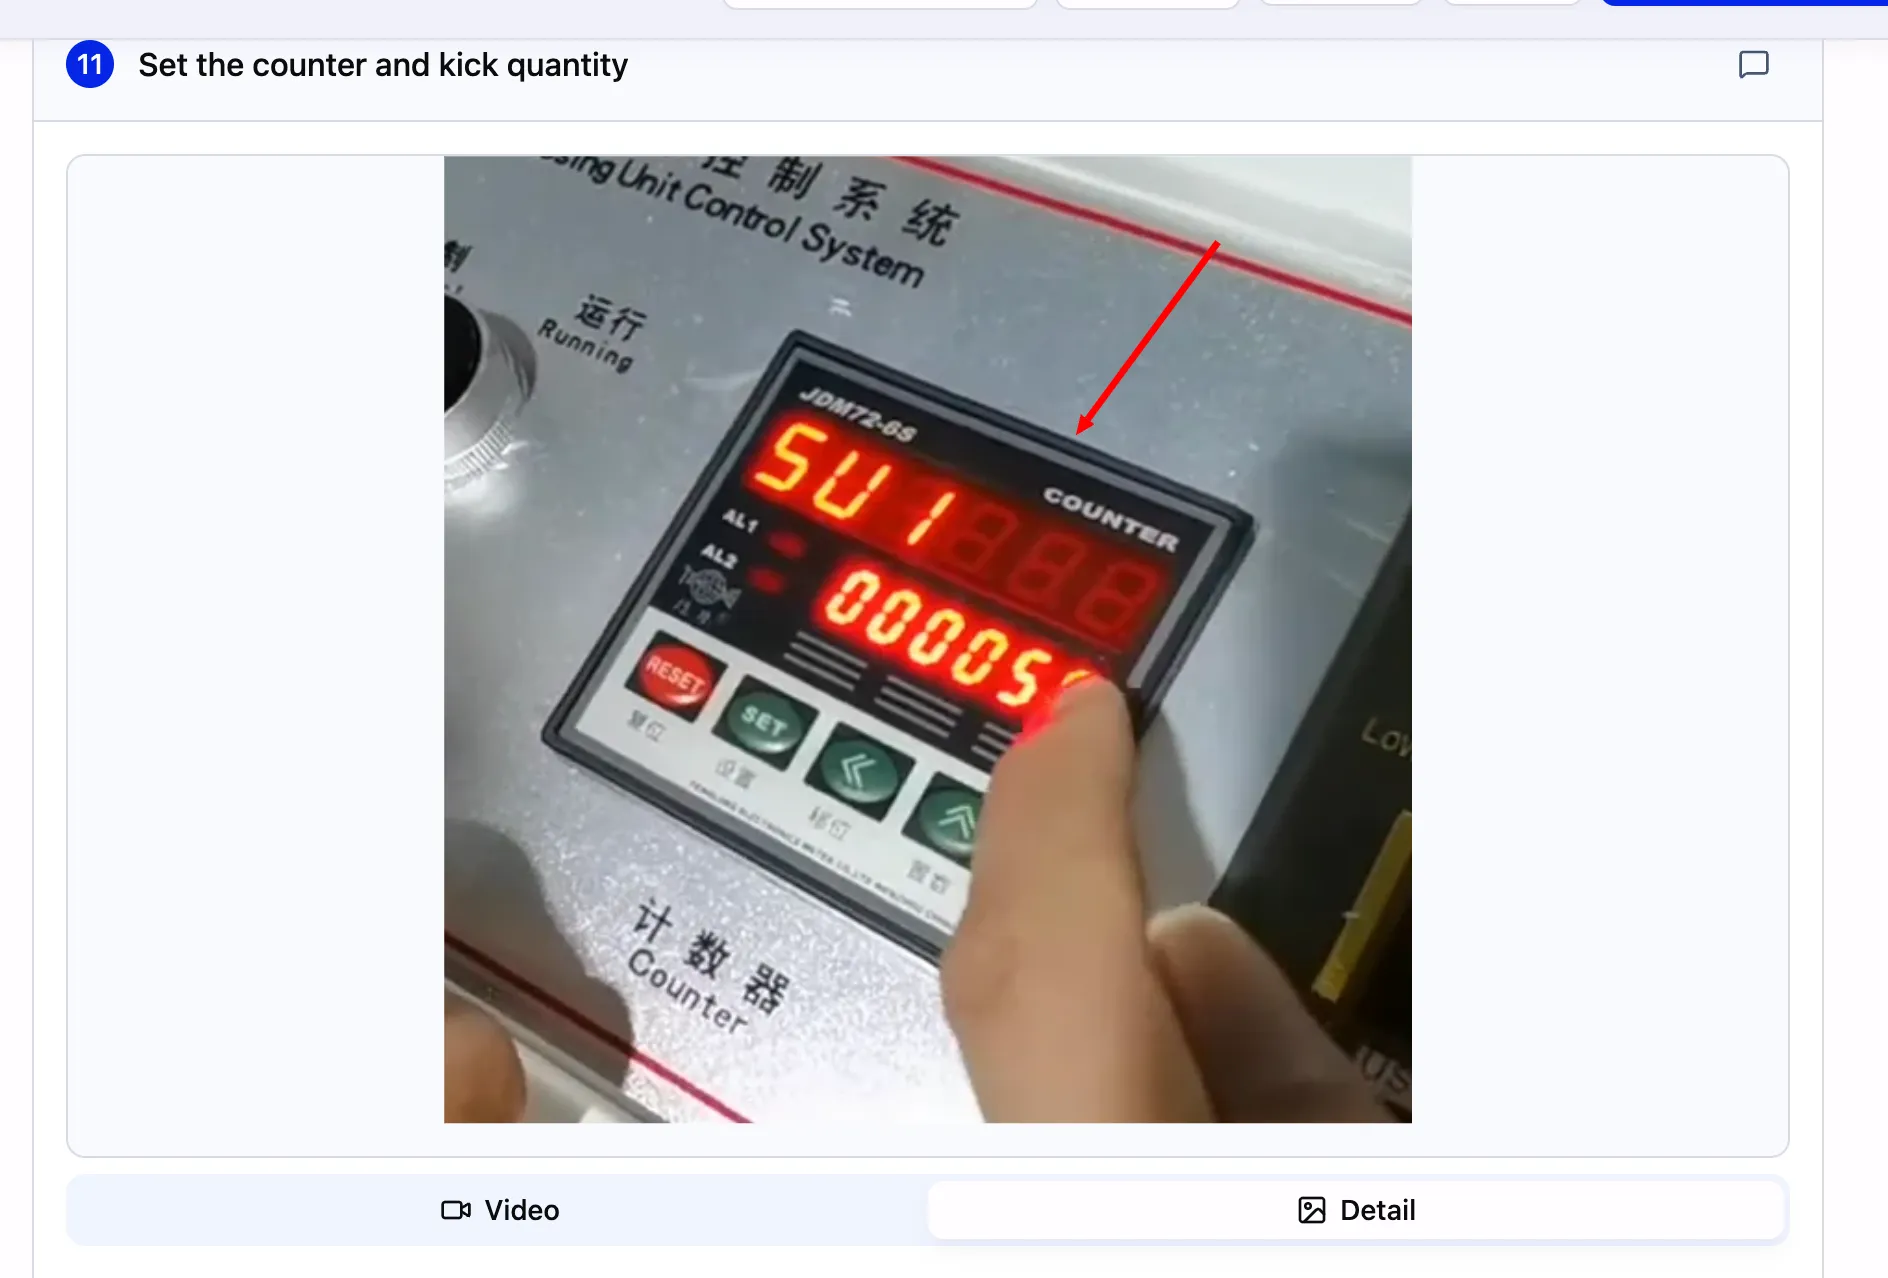
What the viewer sees on the Detail tab.
The video and the Detail are now separate:
| You change… | Does it change the other one? |
|---|---|
| Video zoom or rotation | No. The Detail stays the same |
| Detail crop or rotation | No. The video stays the same |
| Video annotations (timed) | Only on the video |
| Detail annotations (still) | Only on the Detail |
Two more things:
- Show detail only. Turn it on when a step needs only the still picture, with no video.
- Viewers see the Detail tab only when it helps. That means it has annotations, or it is framed differently from the video. Until then, the editor tells you.
What viewers see
Viewers see exactly what you see in the editor.
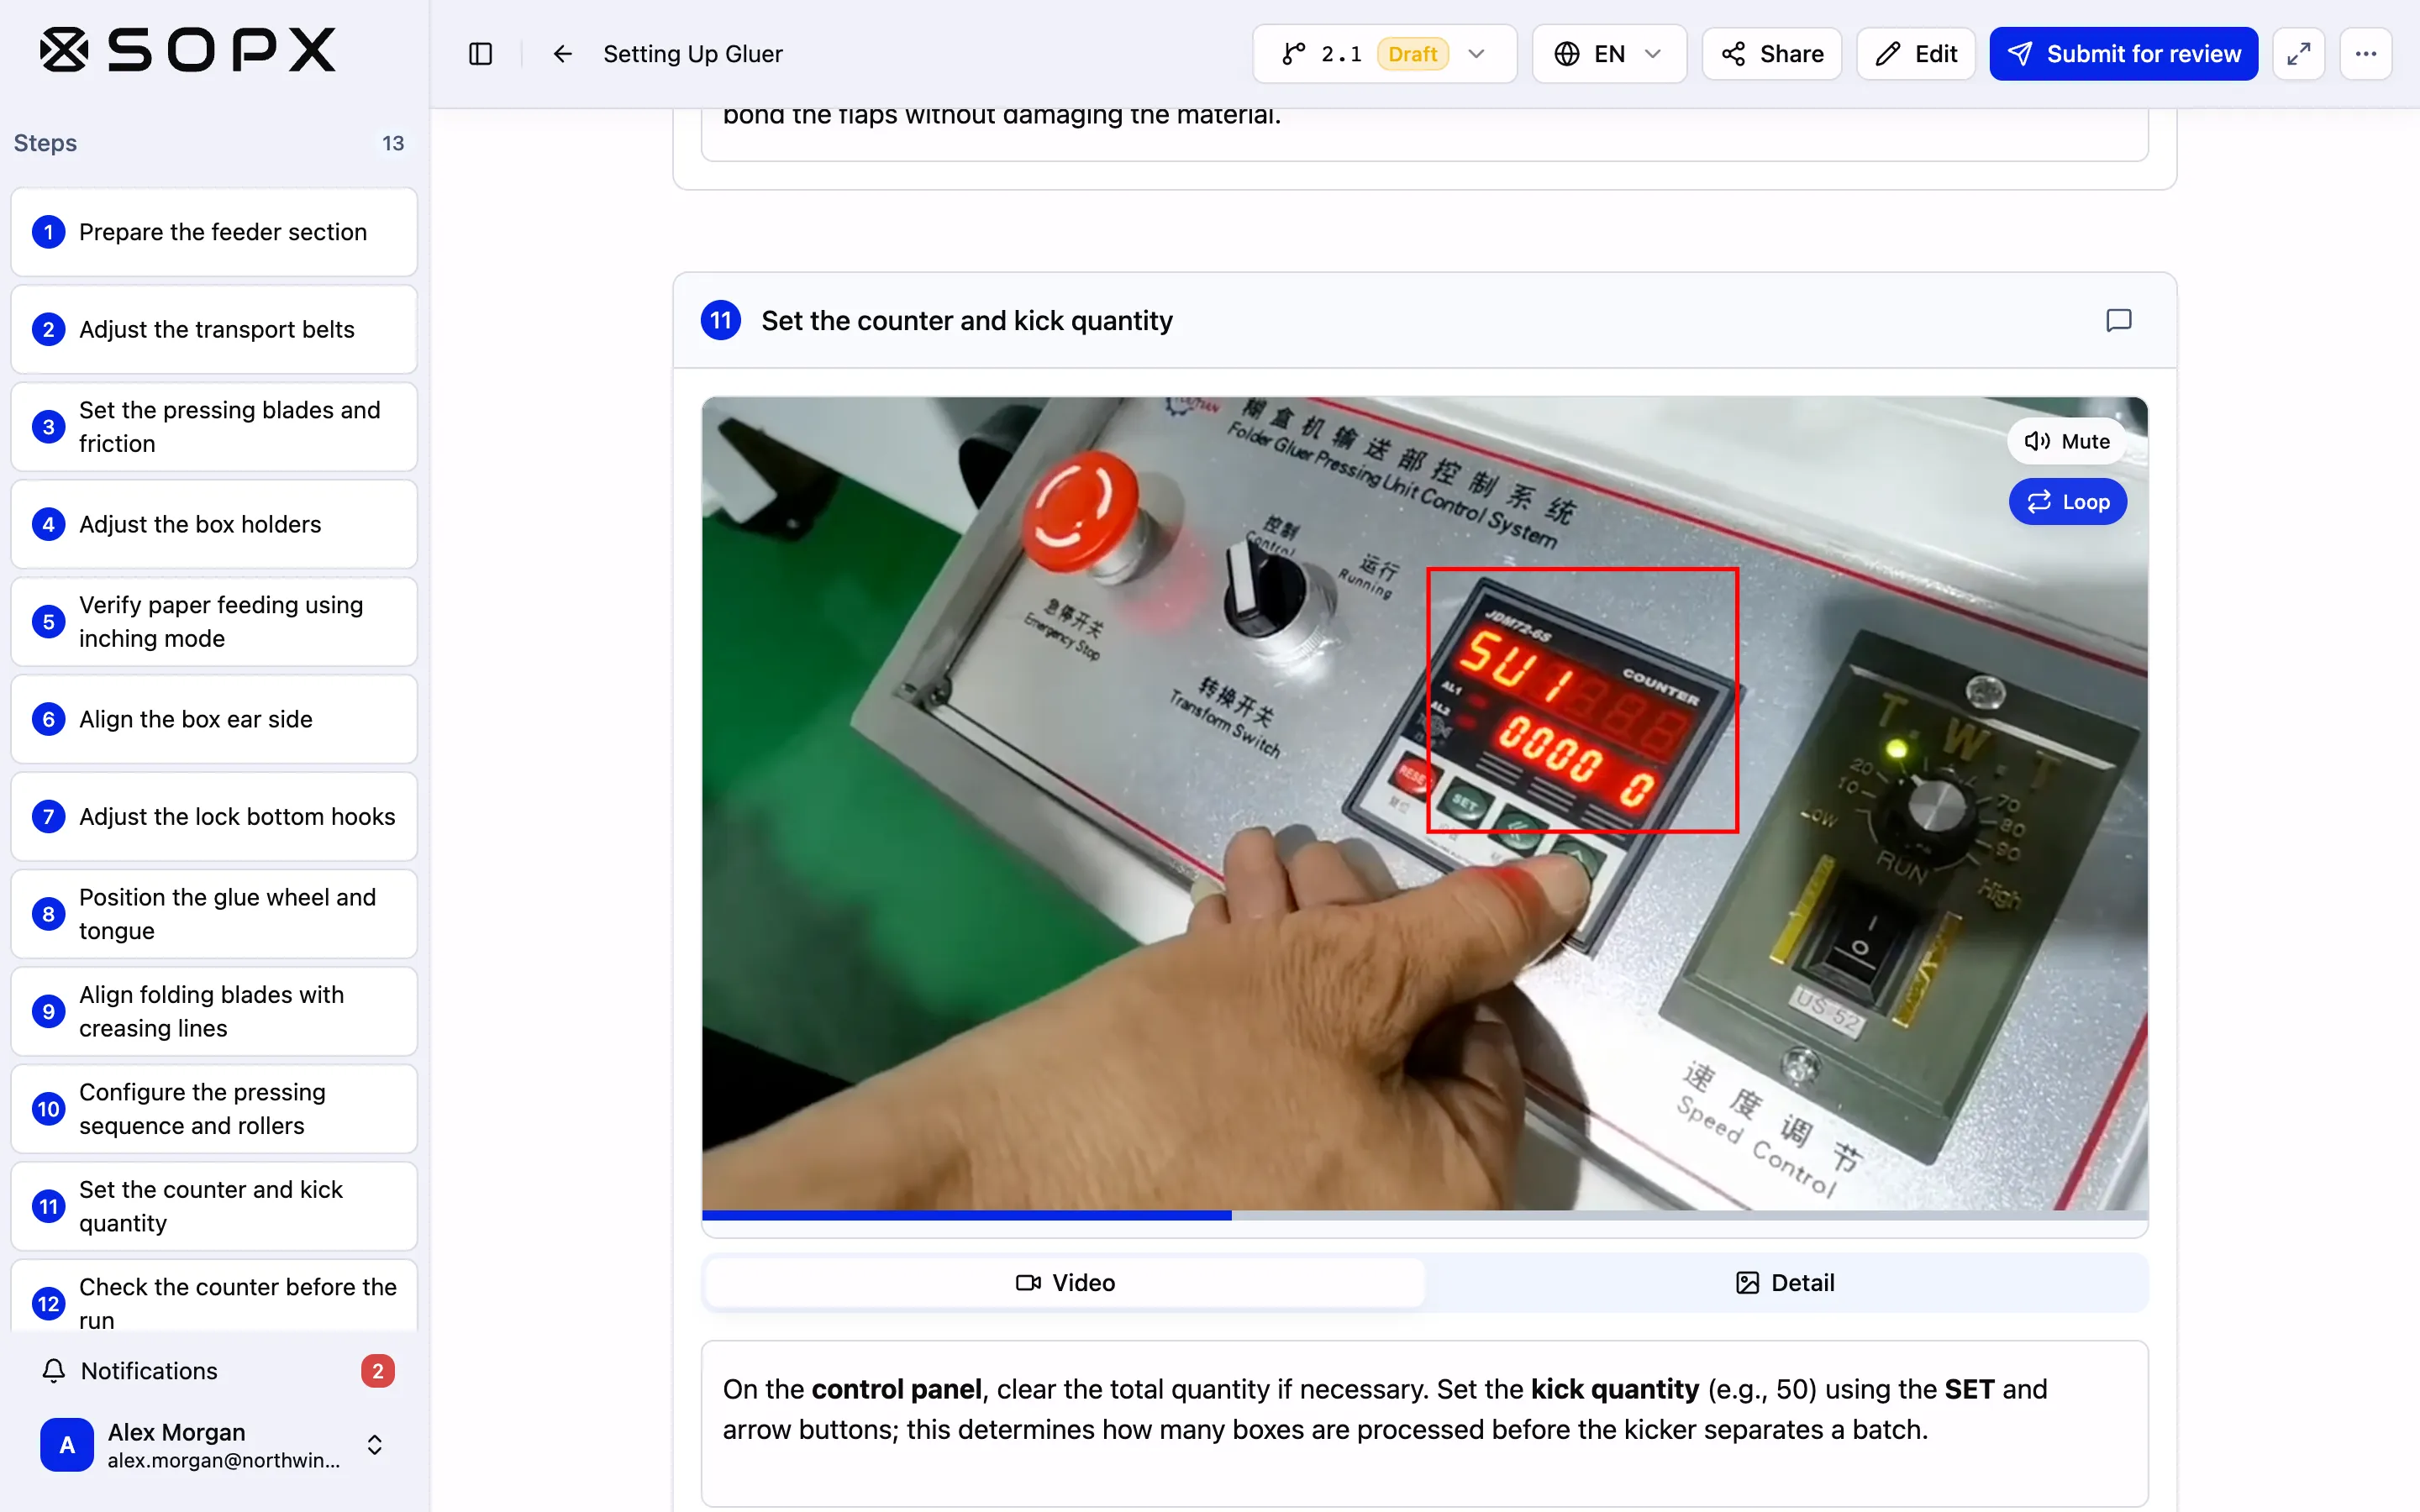
The box is on screen only while the operator sets the batch quantity.
Timed annotations come and go with the video. This also works when people:
- jump to another point in the video,
- play it at 2x speed,
- watch in full screen or on a phone,
- follow the SOP in a run,
- open a public share link or an embedded procedure.
Edited photos look the same everywhere too.
Exports: PowerPoint, SCORM and PDF
Your edits go with the SOP when you export it.
| Export | Timed video annotations | Edited photos and the Detail |
|---|---|---|
| PowerPoint (.pptx) | Burned into the clip. They show only at their time | The Detail gets its own slide after the video, with the same title |
| SCORM 1.2 | Burned into the clip. They show only at their time | The Detail shows under the video on the same page |
| PDF, Word and Markdown | Not included, because these files can’t play video | Edited photos as edited, and the Detail for each clip |
In PowerPoint, the picture before you press play shows the annotations at that frame. Here the ellipse is on the video slide:
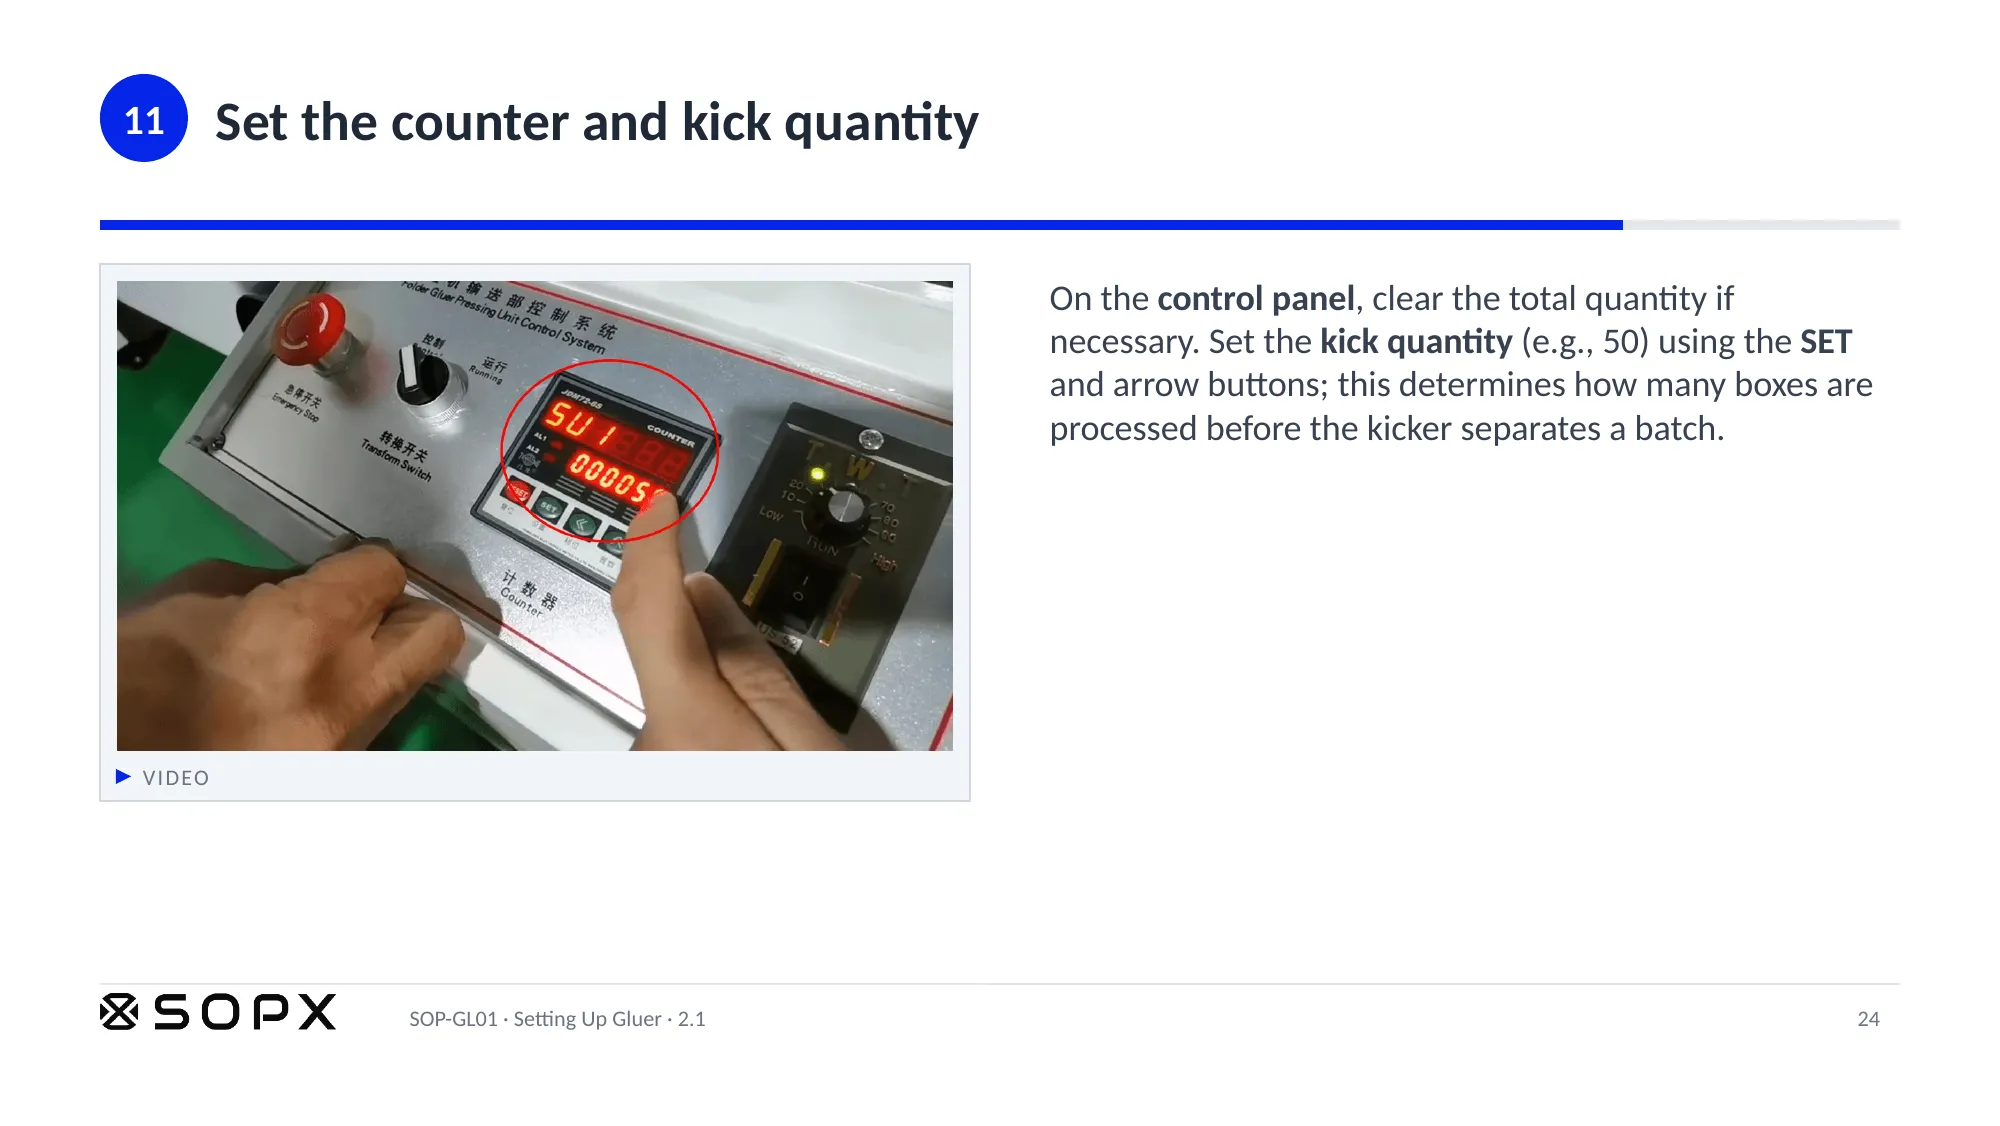
A PowerPoint video slide with the annotation on its poster.
And this is one frame from the exported clip, at 0:20. The box is burned in:
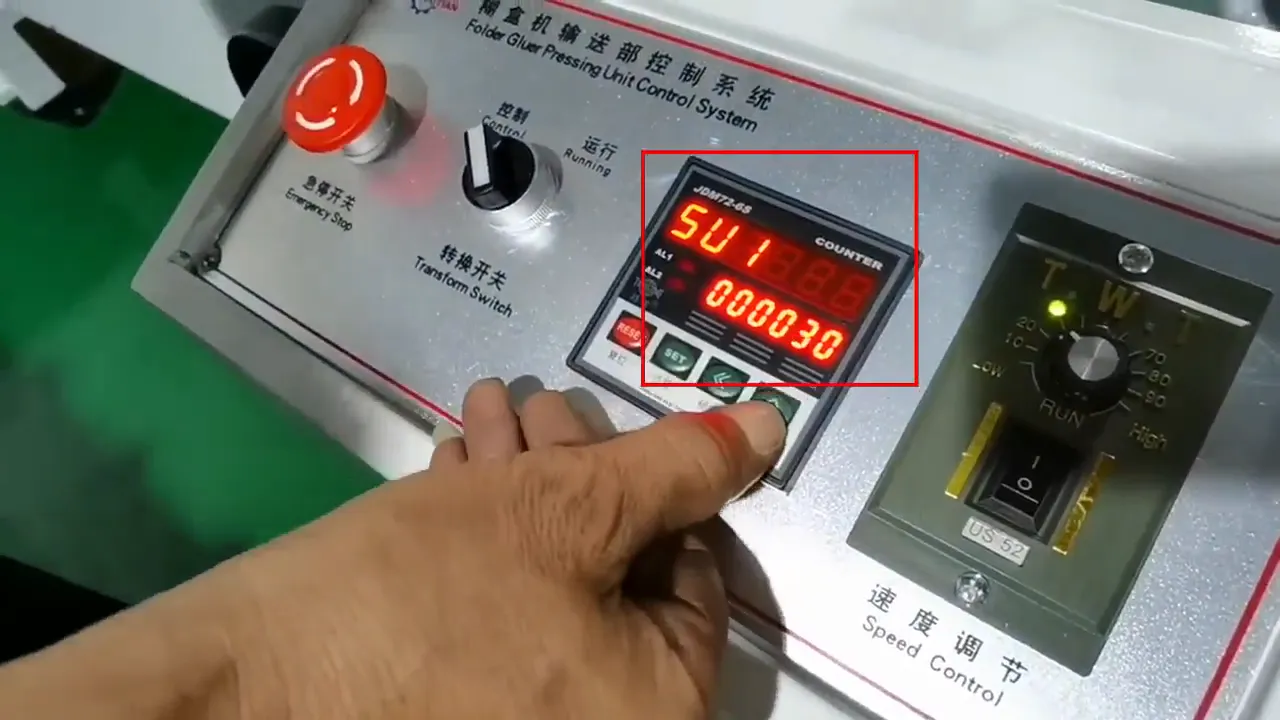
The box is part of the exported video.
In the PDF, the edited photo looks just like it does in the app:
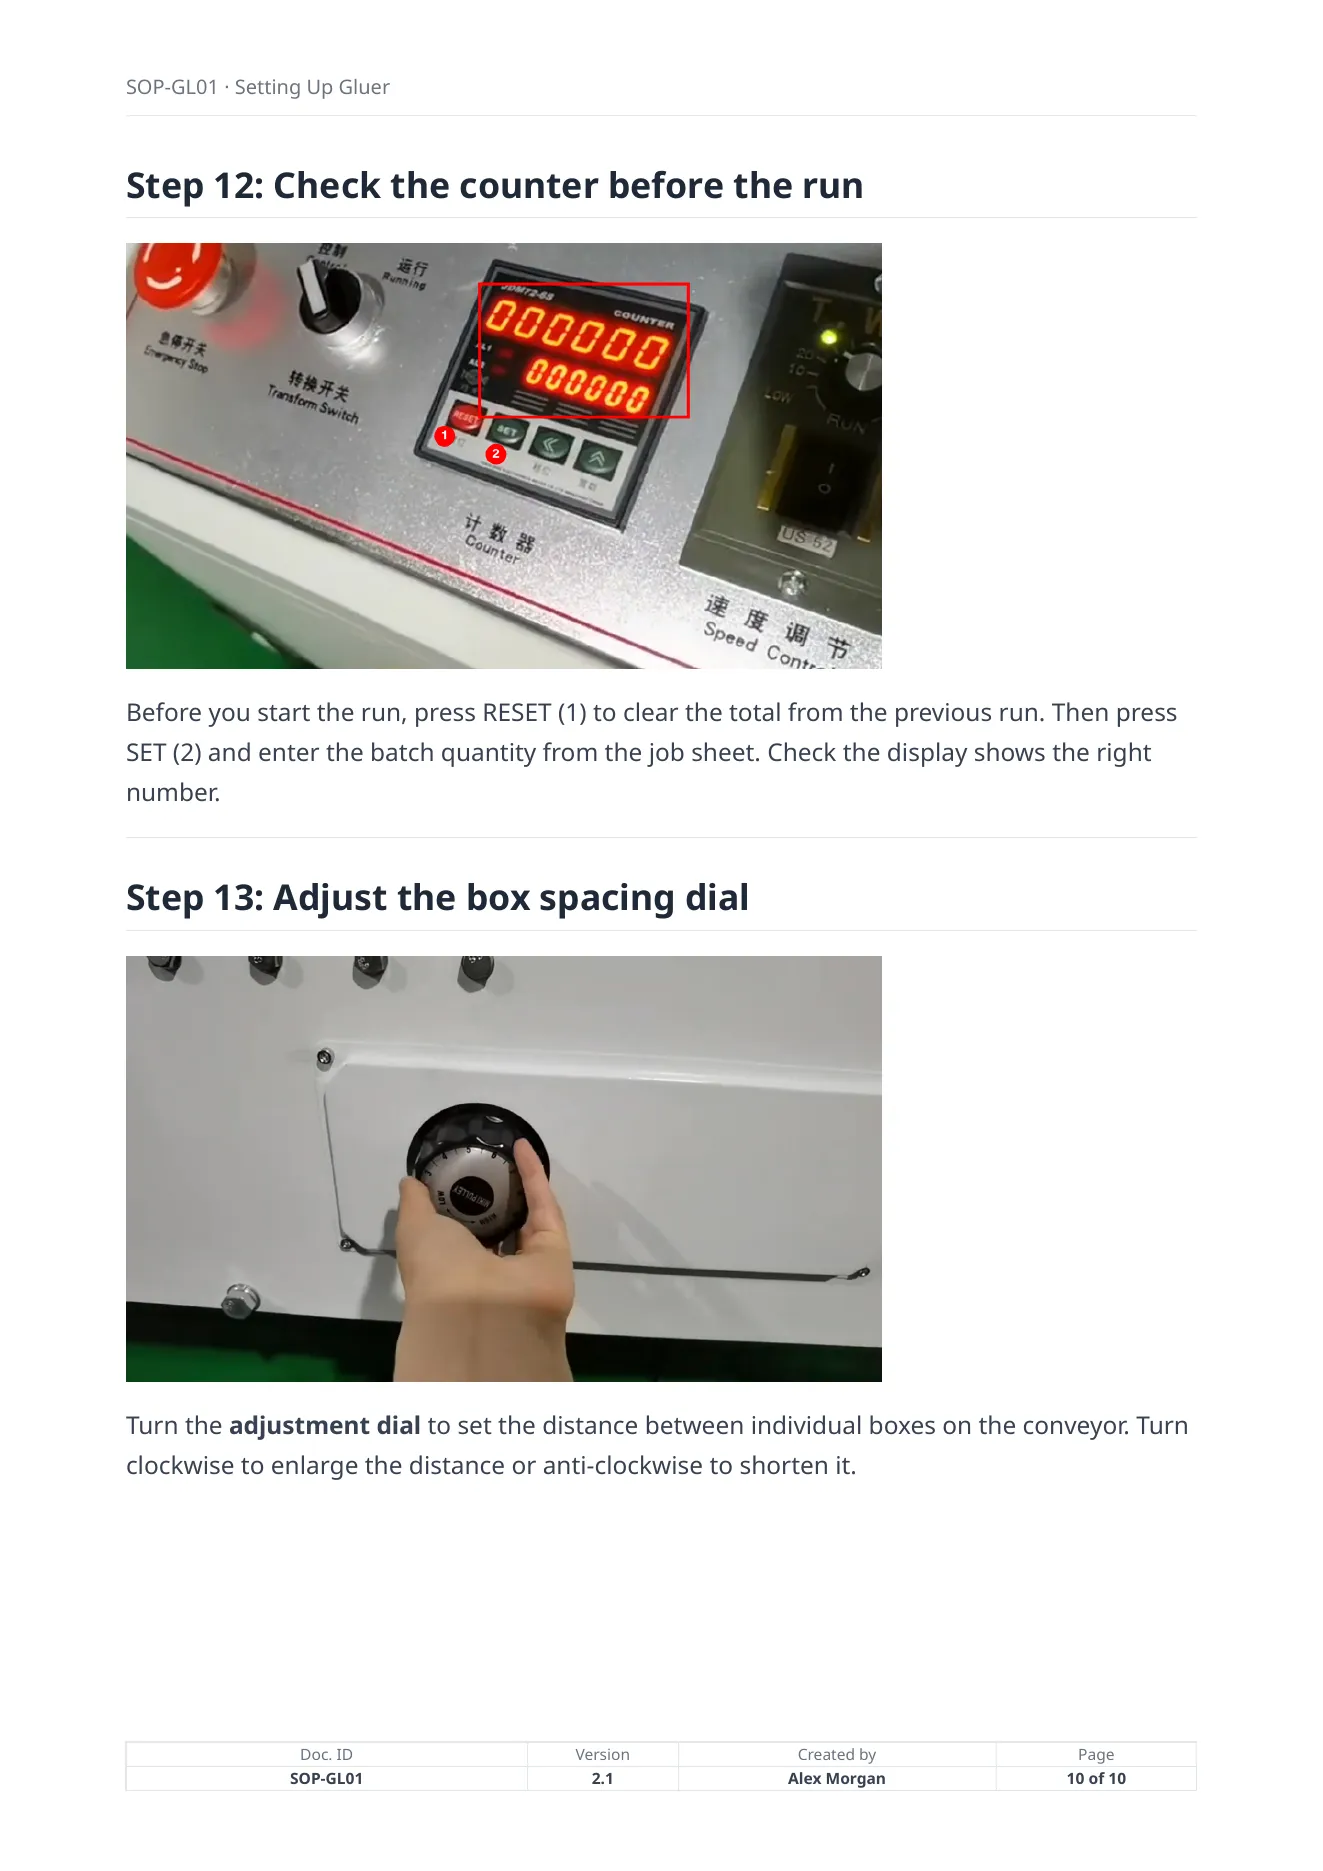
The edited, annotated photo in the PDF export.
Transparent images stay transparent in every export.
Read more about PowerPoint and Markdown export and SCORM export for your LMS. Which exports come with which plan is on the pricing page.
What this release does not do yet
We want you to know what to expect:
- You can’t add timed annotations on a phone yet. Watching them works.
- An annotation stays where you drew it. It does not follow a moving part.
- The timeline does not snap bars to each other.
- PDF, Word and Markdown exports do not show timed annotations.
- Edit clip turns a video in quarter turns and zooms. It does not straighten a video.
- There are no brightness, contrast, blur or hide tools yet.
Who can use it
- Every plan. None of these tools need a higher plan.
- Anyone who can edit the SOP. That means owners, admins and creators with edit access. Viewers see the result, without the edit buttons.
- Published versions stay locked. Your edits go into a new draft version, as always.
Frequently asked questions
Can I annotate a video so the arrow shows only at one moment?
Yes. Click Annotate clip on the step’s Video tab. Draw the arrow, then set its Start and End time on the timeline. It shows only between those times.
Does editing a photo change the original file?
No. SOPX keeps the original photo. Click Reset at any time to get the whole picture back.
Can I crop a step photo to a square or 16:9?
Yes. In Edit image, pick a Shape: Free, Original, Square, 4:3, 16:9, 3:4 or 9:16.
Do timed annotations show in PowerPoint?
Yes. They are burned into the exported clip and show only during their time. SCORM works the same way.
Can I edit photos on my phone?
Yes. Edit image works with touch. Adding timed video annotations needs a computer for now.
Try it now
- Open any procedure and click Edit.
- Find a step photo and click Edit image.
- Rotate it, straighten it and crop it. Click Save image.
That takes about ten seconds. New to SOPX? Film a job on your phone and AI turns the video into an SOP. Then add arrows where people need to look. To learn the basics of marking up steps, see how to add annotations to SOPs.